
TL;DR
The most powerful way to create AI videos does not start with typing a description into a text-to-video tool. It starts with a carefully crafted image.
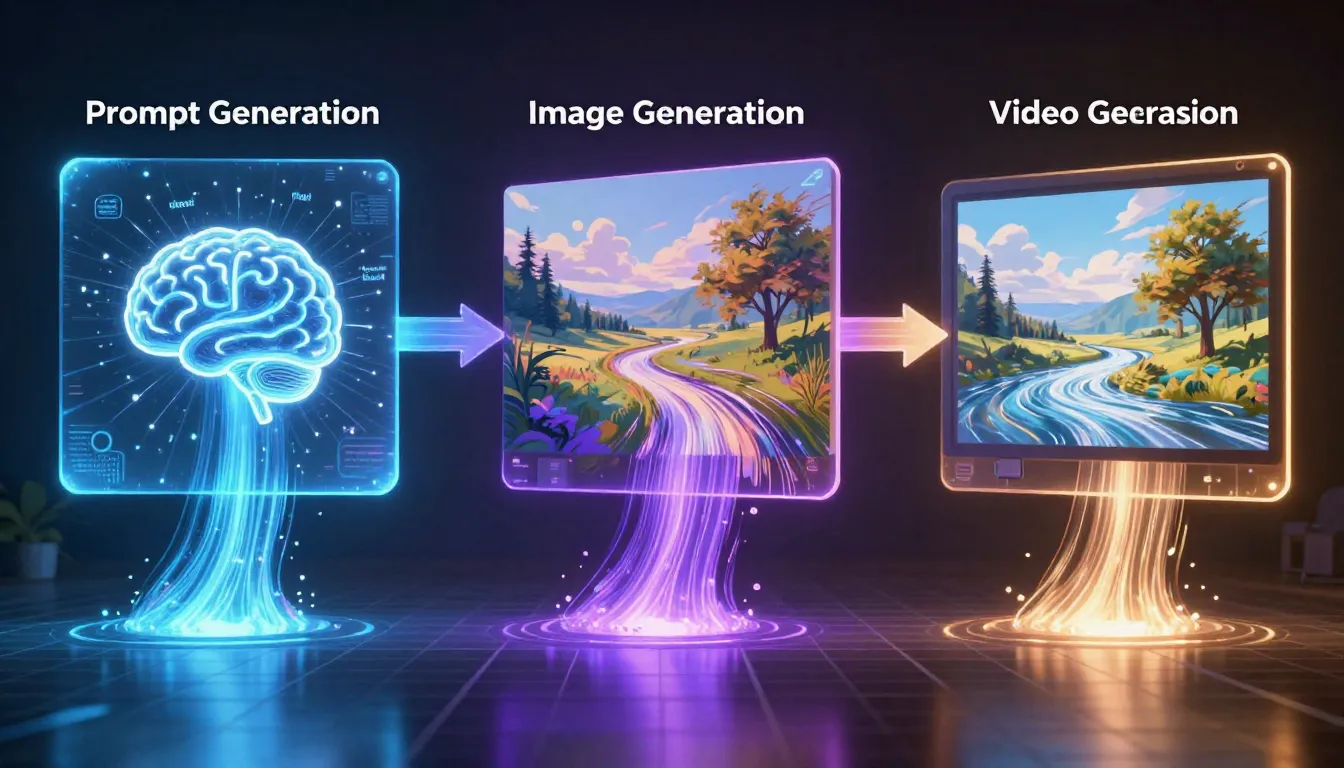
The three-stage pipeline -- Prompt, Image, Video -- produces dramatically better results than text-to-video alone. You generate a professional prompt, use that prompt to create a precisely composed image, and then feed that image into a video generator as the first frame. The result is a video where you control exactly what the opening shot looks like, how the scene is lit, what the composition contains, and how motion unfolds from a known starting point.
Seedance is the only platform that offers all three stages in one place: an Image Prompt Generator that writes professional prompts, a Text-to-Image generator that creates high-quality reference images, and an Image-to-Video generator that transforms those images into cinematic video clips. No tool-switching. No downloading and re-uploading. One integrated pipeline from concept to finished video.
Step 1: Generate your prompt --> | Step 2: Create your image --> | Step 3: Generate your video -->
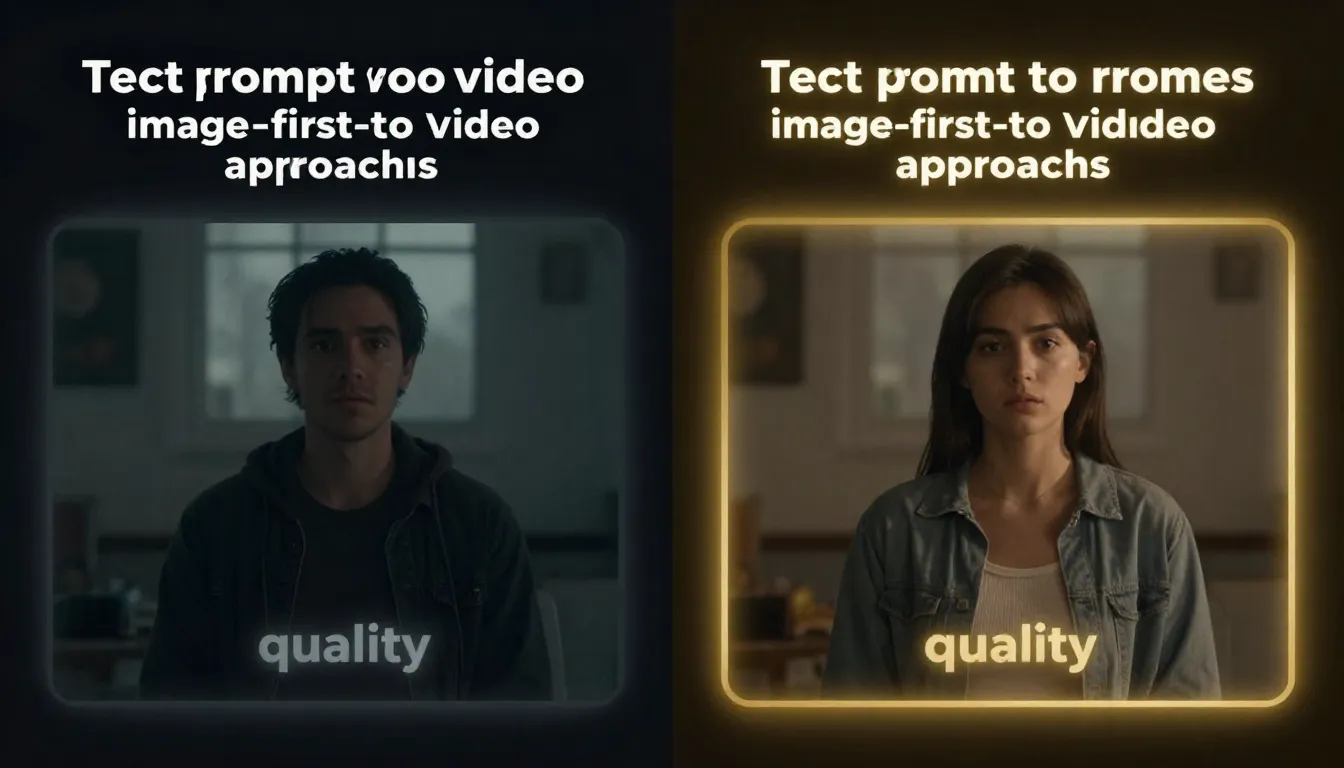
Left: text-to-video generates both visuals and motion from a text prompt alone -- unpredictable composition, random framing. Right: the image-first pipeline lets you perfect the visual before adding motion -- controlled composition, consistent quality.
Why Image-First Video Creation Beats Text-Only
If you have ever used a text-to-video tool, you know the frustration. You write a detailed prompt describing exactly what you want -- the subject, the lighting, the camera angle, the composition -- and the AI returns something that looks nothing like what you imagined. The character is facing the wrong direction. The lighting is flat. The composition feels random. The subject looks different from what you described.
This is not a flaw in any specific tool. It is a fundamental limitation of text-to-video as an approach.
The Limitations of Text-to-Video
Text-to-video asks the AI to do two extremely difficult things simultaneously: create the visual content and generate motion. The model must interpret your words, decide what every pixel should look like, compose the scene, set the lighting, position the camera, and then generate plausible motion -- all from text alone.
The result is unpredictable on every dimension:
- Composition is random. You might ask for "a woman standing in the center of a city street" and get her positioned in the left third with half the frame occupied by a building you did not ask for.
- Characters are inconsistent. The face, clothing, hair, and body proportions change between generations. What you get is a creative interpretation, not your specification.
- Lighting is uncontrolled. Even detailed lighting descriptions ("golden hour, warm directional light from the left") produce wildly variable results. The AI's understanding of lighting language is approximate at best.
- Framing is unreliable. Close-up, medium shot, wide shot -- text-to-video tools interpret these terms inconsistently. You might ask for a tight close-up and get a full-body shot.
For exploratory creative work, this unpredictability can be charming. For professional work where you need specific, reliable results, it is a dealbreaker.
The Image-First Advantage
Image-to-video flips the equation entirely. Instead of asking the AI to create visuals and motion simultaneously, you separate the two tasks:
- First, you create the image. You control every visual aspect -- subject, composition, lighting, color, framing. You iterate until the image is exactly right.
- Then, you add motion. The AI's only job is to make your perfected image come to life. It does not need to interpret vague descriptions or make compositional choices. It starts from your concrete visual anchor and generates movement.
This separation of concerns produces better results across every dimension:
- Composition is locked. Your subject is exactly where you placed it.
- Characters are consistent. The face, clothing, and proportions match your source image throughout the entire video.
- Lighting is preserved. The lighting direction, quality, and color temperature carry forward from your image.
- Framing is defined. The camera position and field of view start exactly where your image specifies.
Think of it this way: text-to-video is like describing a movie scene to someone over the phone and asking them to film it. Image-to-video is like showing them a photograph of exactly what the first frame should look like and saying "now make this move." The second approach produces more predictable, higher-quality results because the AI has a concrete visual reference instead of an abstract verbal description.
The Quality Multiplier
The benefits compound. A well-crafted first frame image improves every aspect of the resulting video:
- Temporal consistency improves because the model has a high-quality visual anchor to maintain throughout the sequence.
- Motion quality improves because the model can extract accurate depth, lighting, and spatial information from a clear source image.
- Style coherence improves because the color palette, mood, and aesthetic are embedded in the image, not left to text interpretation.
- Artifact rate decreases because the model starts from clean, high-resolution visual data rather than synthesizing everything from noise.
Videos generated from high-quality first frames consistently score higher in visual quality, temporal coherence, and viewer preference compared to text-to-video outputs from equivalent prompts. This is not a subtle difference -- it is the gap between "impressive AI demo" and "usable professional content."
For a deep dive on designing images specifically for video generation, see our First and Last Frame Guide.
The Three-Stage AI Creative Pipeline
The complete workflow has three distinct stages, each building on the previous one. Rushing through any stage degrades the final output. Understanding what each stage contributes -- and where to invest your time -- is the key to consistently producing high-quality AI video.
Stage 1: Prompt Generation
Everything starts with the prompt. A mediocre prompt produces a mediocre image, which produces a mediocre video. A great prompt produces a stunning image, which produces a stunning video. Prompt quality is the single biggest variable in final output quality, and it is the most underinvested stage in most workflows.
The problem with manual prompting. Most people write prompts like they write search queries: short, vague, and focused only on the subject. "A luxury watch on a dark background." This tells the AI what to show but nothing about how to show it. The model fills in the gaps with generic defaults -- flat lighting, centered composition, no atmospheric detail, no style direction.
The solution: AI-assisted prompting. A prompt generator expands your rough idea into a professional, multi-dimensional prompt that specifies subject, environment, lighting, color palette, composition, style, and quality modifiers. The difference in output quality between a 10-word manual prompt and a 100-word generated prompt is dramatic.
Seedance's Image Prompt Generator does exactly this. Input a short description like "luxury watch commercial, dark dramatic," select a style (photorealistic, cinematic, illustration, etc.), and the AI generates a complete professional prompt ready for image generation. The process takes seconds and costs 2 credits per generation. For a comprehensive guide on prompt generation, see our AI Image Prompt Generator Guide.
Why this stage matters so much. Your prompt is the DNA of your entire pipeline. It determines the style, mood, composition, and quality ceiling of everything that follows. Spending 5 minutes refining your prompt before touching image generation saves 30 minutes of iterating on mediocre images later.
Stage 2: Image Generation
With a professional prompt in hand, the next stage is generating the image that will become your video's first frame. This is where you transition from words to visuals, and it is where most of your iteration time should be spent.
From prompt to image. Paste your generated prompt into a text-to-image tool and generate. Evaluate the output. Does the composition work for video? Is the lighting dynamic enough? Does the subject look right? Is there visual depth in the scene?
If you already have a reference image or a previous generation you want to refine, Image-to-Image is your tool. Upload an existing image and describe what you want to change. This is particularly powerful for iterating on compositions -- you can adjust lighting, add atmospheric effects, or modify the scene without starting from scratch. For a complete guide on image-to-image workflows, see our Image-to-Image AI Guide.
Designing images specifically for video use. Not every great image makes a great first frame for video. When generating images intended for the pipeline, keep these composition principles in mind:
- Leave negative space in the direction subjects will move. If a person will walk left to right, position them slightly right of center.
- Include depth layers. Images with a clear foreground, midground, and background produce better parallax effects and more natural camera movement in video.
- Consider camera direction. If you plan to use a "dolly in" motion, ensure the image works at both the current crop and a tighter crop of the center area.
- Avoid heavy text or symmetrical patterns. These elements are difficult for video models to animate naturally and often produce artifacts.
- Use dynamic lighting. Strong directional light with visible shadows creates more cinematic video output than flat, even illumination.
The key principle: spend time getting the image RIGHT. Every minute you invest in perfecting the image saves multiple minutes in video generation. A flawless first frame produces a usable video on the first try. A flawed first frame requires multiple video generations (each consuming credits and time) that may never produce a satisfactory result.
Iterate 3--5 times on the image before moving to video generation. This is not perfectionism -- it is efficiency.
For the complete guide to text-to-image generation including prompting techniques and tool comparisons, see our Text-to-Image AI Complete Guide. For an overview of the best image generation tools available, see Best AI Image Generators 2026.
Create your image --> | Refine with Image-to-Image -->
Stage 3: Video Generation
This is the payoff. Your perfected image becomes the starting point of a dynamic video clip.
Upload the image as the first frame. In Seedance's Image-to-Video tool, upload your generated image. The tool accepts the image directly from your generation history -- no downloading and re-uploading required.
Add motion through text guidance. Write a prompt that describes the motion you want, not the visuals (the image already handles that). Focus on:
- Camera movement: "slow dolly in," "gentle pan left," "smooth orbit around the subject"
- Subject action: "the woman turns her head slowly," "petals drift downward," "steam rises from the cup"
- Environmental motion: "clouds shift slowly," "water ripples outward," "leaves sway gently in the breeze"
- Atmosphere: "dramatic atmosphere," "dreamy, ethereal quality," "cinematic pacing"
Generate and review. The AI takes your image and your motion prompt and produces a video clip that starts exactly at your first frame and unfolds according to your motion directions. Because you controlled the visual starting point, the output is predictable and consistent. The video quality inherits the image quality -- a sharp, well-lit, well-composed first frame translates directly into a sharp, well-lit, well-composed video.
For advanced motion control techniques and first-frame/last-frame pairing, see our First and Last Frame Guide. For a complete introduction to image-to-video AI, see our Image-to-Video AI Guide.
The three-stage pipeline in action: a short description becomes a professional prompt, the prompt becomes a high-quality image, and the image becomes a dynamic video clip. Each stage builds on and amplifies the quality of the previous one.
The Seedance Advantage: All Three Stages in One Platform
Most creators building this pipeline today are duct-taping three or four separate tools together. They use ChatGPT or Claude to write image prompts. They switch to Midjourney or DALL-E to generate images. They download the image, navigate to Runway or Kling, upload it again, and generate video. Each switch involves a different interface, a different account, a different credit system, and a different set of limitations.
This fragmented workflow is not just inconvenient. It actively degrades quality.
How Tool-Switching Hurts Quality
Every time you move an image between tools, something is lost. The download-upload cycle introduces compression artifacts. The format conversion (PNG to JPG, WebP to PNG) changes color values. The resolution may be resampled. Metadata about how the image was generated -- which could help the video model produce better output -- is stripped away.
Beyond data quality, there is cognitive overhead. Each tool has different prompt syntax, different output settings, different aspect ratio options. You waste time re-learning interfaces instead of focusing on creative iteration.
The Integrated Pipeline
Seedance eliminates every one of these friction points by offering all three pipeline stages within a single platform:
1. Image Prompt Generator (/image-prompt-generator). Input your concept, select a style from 12 options, and receive a complete professional prompt. The generated prompt is optimized for Seedance's image generation models but works with any AI image tool.
2. Text-to-Image and Image-to-Image (/text-to-image | /image-to-image). Generate images from your prompt, or refine existing images with guided modifications. Generate multiple variations quickly. When you find the right composition, it is ready immediately for the next stage.
3. Image-to-Video (/image-to-video). Select any generated image from your library and send it directly to the video generator. No downloading. No uploading. No format conversion. The full-resolution image transfers seamlessly, preserving every pixel of quality.
Why Integration Produces Better Results
This is not just a convenience feature. The integration produces measurably better outcomes:
- Zero quality loss in transfers. Images move between stages at full resolution with no compression or resampling.
- Consistent model ecosystem. The image generation model and video generation model are calibrated to work together. Images produced by Seedance's text-to-image tool are inherently well-suited for Seedance's video model.
- Single credit system. No juggling three different subscriptions. Your credits work across all three tools, making it easy to budget and allocate resources.
- Faster iteration cycles. The time from "I want to change the image" to "I am watching the new video" drops from minutes (with tool switching) to seconds (with integrated handoff).
- Creative flow preservation. Staying in one interface preserves your mental context. You are thinking about the creative work, not about file management and tool navigation.
The honest comparison: yes, you can build this pipeline with separate tools. ChatGPT writes good prompts. Midjourney produces excellent images. Runway generates strong video. But the integrated Seedance pipeline removes the friction that causes most creators to give up halfway through the process. The best workflow is the one you actually complete.
Seedance integrates prompt generation, image generation, and video generation into a single platform. Move from concept to finished video without switching tools, downloading files, or managing multiple accounts.
Complete Walkthrough: 3 Real-World Examples
Theory is useful, but practice is what produces results. Here are three complete pipeline walkthroughs -- each demonstrating a different creative objective, different style, and different aspect ratio. Follow along to build your first complete pipeline.
Example 1: Cinematic Product Commercial
Goal: Create a 5-second luxury watch commercial for a product showcase page.
Stage 1 -- Prompt Generation
Open the Image Prompt Generator and enter your concept.
Input: "luxury watch commercial, dark dramatic"
Style selected: Photorealistic
Generated prompt:
A luxury men's wristwatch resting on a slab of dark emperador marble,
shot from a low three-quarter angle. Dramatic studio lighting: a single
hard key light from the upper left creates sharp reflections on the
polished steel case and sapphire crystal. The watch face shows 10:10
with luminous indices glowing faintly. Deep shadows pool around the
base, enhancing the sense of weight and prestige. Background is pure
black, fading to subtle charcoal gradient. Microscopic dust particles
float in the key light beam. Color palette: silver, deep charcoal,
amber highlights from the lume. Photorealistic product photography,
8K resolution, razor-sharp detail on every dial marking and link.
This prompt would take most people 10--15 minutes to write manually. The prompt generator produced it in seconds, and it covers all seven dimensions of a professional prompt: subject, environment, lighting, color, composition, style, and quality.
Stage 2 -- Image Generation
Paste the generated prompt into Text-to-Image. Generate in 16:9 aspect ratio for a landscape video frame.
First generation: the overall composition is strong, but the marble surface reflection is slightly distracting and pulls attention from the watch.
Iteration: Use Image-to-Image to refine. Upload the first generation and prompt: "Reduce the intensity of the marble surface reflection. Increase the sharpness of the watch face details. Make the background gradient slightly deeper."
Second generation: the watch is the clear hero of the frame, the lighting is dramatic, and the composition has depth. This is ready for video.
Stage 3 -- Video Generation
Send the perfected image to Image-to-Video.
Motion prompt:
The camera executes a slow, smooth orbiting movement around the watch,
revealing different angles of the case and bracelet. The key light
shifts subtly as the camera moves, creating dynamic reflections across
the polished surfaces. Dust particles drift slowly through the light
beam. Cinematic, premium commercial pacing. Steady, professional
camera movement.
Result: A polished 5-second product reveal that starts exactly at your composed shot and orbits smoothly around the watch. The dramatic lighting, sharp details, and premium aesthetic carry through from the source image to every frame of the video.
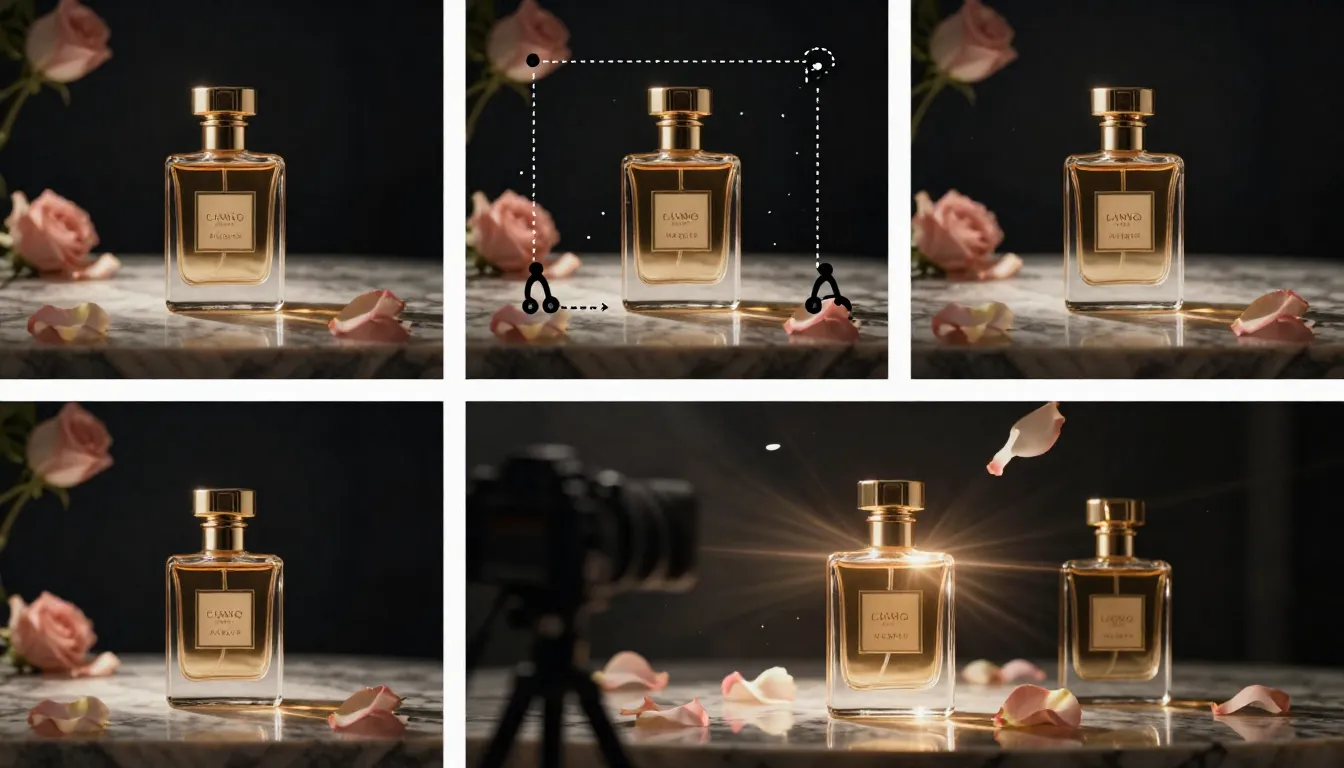
Example 1: Luxury watch commercial. From a 5-word concept input to a polished 5-second product video -- the three-stage pipeline produces commercial-grade output.
Example 2: Social Media Travel Content
Goal: Create a vertical video of a Japanese temple at sunrise for Instagram Reels.
Stage 1 -- Prompt Generation
Open the Image Prompt Generator.
Input: "Japanese temple sunrise, peaceful morning"
Style selected: Photorealistic
Generated prompt:
A traditional Japanese wooden temple (Kiyomizu-dera style) nestled
among ancient cedar trees, photographed at dawn. Golden sunrise light
filters through morning mist, casting long warm shadows across the
temple's wooden veranda. Cherry blossom branches frame the upper
portion of the composition, with delicate pink petals catching the
first light. A stone lantern stands in the foreground left, moss-
covered and weathered. The temple roof's curved eaves are silhouetted
against a sky transitioning from deep indigo to warm peach and gold.
Subtle mist hovers at ground level among the trees. Photorealistic
landscape photography, golden hour lighting, serene and contemplative
atmosphere, high dynamic range, rich natural color palette.
Stage 2 -- Image Generation
Paste into Text-to-Image. Critical setting: generate in 9:16 vertical aspect ratio for Instagram Reels.
First generation: stunning atmosphere, but the cherry blossom branches are positioned too high in the frame, leaving dead space in the lower third.
Iteration: Regenerate with a slight prompt modification adding "cherry blossom branches extending from the upper right and left corners, filling the upper third of the vertical frame." The second generation places the blossoms perfectly as a natural vignette.
The composition is strong for vertical video: the temple draws the eye to the center, cherry blossoms create visual interest at the top, the stone lantern and mist provide depth in the foreground. This frame has multiple layers of motion potential.
Stage 3 -- Video Generation
Send to Image-to-Video.
Motion prompt:
Gentle cherry blossom petals drift slowly downward through the frame.
Morning mist shifts and swirls at ground level among the trees. Two
birds fly across the sky in the background. The sunrise light gradually
intensifies, warming the scene. A subtle breeze moves the cherry
blossom branches slightly. Peaceful, meditative atmosphere. Slow,
contemplative pacing.
Result: A 4-second atmospheric vertical video perfect for Instagram Reels. The cherry blossoms drift naturally, the mist adds depth and movement, and the birds create a small focal point of action in the background. The golden hour warmth of the source image permeates every frame.
Example 3: Brand Storytelling with First and Last Frames
Goal: Create a 6-second brand story -- a coffee shop transitioning from empty morning to bustling with customers.
This example uses the pipeline twice to create a first frame and last frame pair, giving the video model two visual anchors that define the narrative arc. For a deep dive on this technique, see our First and Last Frame Guide.
Stage 1 -- Two Prompts
Generate two prompts from the Image Prompt Generator.
First frame input: "empty coffee shop, early morning light, warm amber tones"
Generated first frame prompt:
Interior of an artisanal coffee shop in the early morning, before
opening. Warm amber sunlight streams through large front windows,
casting long golden rectangles across worn hardwood floors. Exposed
brick walls, a polished wooden counter with a brass espresso machine,
and empty mismatched chairs around small tables. A chalkboard menu
hangs behind the counter. Dust motes float in the sunbeams. The space
feels warm, inviting, and full of potential. Shot at eye level from
just inside the entrance. Photorealistic interior photography, warm
color palette, golden hour tones, cozy atmosphere.
Last frame input: "busy coffee shop, warm morning, customers enjoying coffee"
Generated last frame prompt:
The same artisanal coffee shop, now alive with morning activity.
Diverse customers sit at tables -- some reading, some talking, some
working on laptops. A barista behind the counter steams milk, creating
a plume of white steam. Coffee cups and pastries fill the tables. Warm
morning light still streams through the windows but is supplemented by
the warm glow of pendant lights. The atmosphere is bustling but cozy,
full of quiet energy and the warmth of community. Shot from the same
eye-level position just inside the entrance. Photorealistic interior
photography, warm tones, lively atmosphere.
Stage 2 -- Two Images
Generate the first frame in Text-to-Image at 16:9 aspect ratio. Iterate until the empty coffee shop looks warm and inviting with strong amber morning light.
For the last frame, use Image-to-Image. Upload the first frame as the reference image and use the last frame prompt. This is critical -- using the first frame as a reference ensures visual consistency. The architecture, furniture, lighting direction, and color palette remain identical between frames. The only change is the addition of people and activity.
Iterate on the last frame to ensure the customers look natural and the barista is positioned behind the counter. The key: the two images should look like the same location photographed at two different times, not two different places.
Stage 3 -- Video Generation
Upload the first frame to Image-to-Video. In platforms that support last-frame reference, upload the last frame as well.
Motion prompt:
Time-lapse style transition. The empty coffee shop gradually fills
with people arriving -- customers entering, sitting down, a barista
beginning to work. Morning light shifts slowly. The scene transitions
from quiet solitude to warm, bustling community. Smooth, cinematic
pacing. The camera position remains fixed.
Result: A 6-second brand story that tells a complete narrative arc -- a coffee shop coming to life. The first frame establishes the serene, inviting space. The last frame provides the destination. The AI generates the transition between them: doors opening, customers filtering in, the barista starting the espresso machine, cups appearing on tables. The brand message is implicit and powerful -- this is a place people come to feel at home.
Example 3: Brand storytelling with first and last frame pairing. The AI generates a time-lapse transition between two visual anchors -- from empty morning quiet to bustling community warmth.
Pipeline Optimization Tips
After producing hundreds of videos through this pipeline, these are the five principles that make the biggest difference in output quality.
Tip 1: Spend 80% of Your Time on the Image
This is the single most important optimization. The image is the quality bottleneck of the entire pipeline. A perfect image produces a usable video on the first try. A mediocre image produces mediocre video no matter how good your motion prompt is.
The time allocation should be roughly:
- Prompt generation: 5% (seconds with a prompt generator, minutes manually)
- Image generation and iteration: 80% (generate, evaluate, refine, regenerate until the frame is right)
- Video generation: 15% (upload, write a motion prompt, generate)
Most beginners invert this -- they spend 10 seconds on the image and then generate video after video, hoping one will look good. Experienced users spend 10 minutes on the image and get a good video on the first or second try. The second approach uses fewer credits, less time, and produces better results.
Iterate 3--5 times on the image before starting video generation. This is not perfectionism. This is efficiency.
Tip 2: Design for Motion
A beautiful photograph and a great video first frame are not the same thing. When generating images for the pipeline, think about what happens when the image starts moving.
Leave negative space where subjects will move. If a person is going to walk left to right, do not center them -- position them slightly right so there is room for the motion. If the camera will pan left, ensure there is interesting visual content to the left of the current frame.
Consider camera direction when composing. A dolly-in shot looks best when the center of the image contains the most interesting detail. A pan shot needs visual interest across the entire width. An orbit shot needs a three-dimensional subject with depth, not a flat surface.
Avoid complex symmetrical compositions. Perfect symmetry looks stunning in photographs but creates problems for video generation. The AI struggles to maintain exact symmetry across frames, and the resulting wobble is distracting. Asymmetric compositions with natural visual flow produce smoother video.
Include depth cues. Images with overlapping elements at different distances -- a foreground object, a midground subject, a background environment -- give the AI depth information that translates into better parallax effects and more natural camera motion.
For a comprehensive guide on designing images specifically for video, see our First and Last Frame Guide.
Tip 3: Match Aspect Ratios Across Stages
Aspect ratio mismatches between the image and video stages are one of the most common pipeline mistakes, and they always degrade output quality.
- 16:9 for landscape video (YouTube, presentations, website hero sections)
- 9:16 for vertical video (Instagram Reels, TikTok, YouTube Shorts)
- 1:1 for square video (Instagram feed, some social ads)
Set the aspect ratio at the image generation stage, not at the video stage. If you generate a 1:1 square image and then try to create a 16:9 video from it, the video model will need to invent content for the sides -- and that invented content will be lower quality than the rest of the frame. Generate your image in the final video's aspect ratio from the start.
Tip 4: Use Consistent Prompting Language Across Stages
The style keywords in your image prompt and your video motion prompt should speak the same visual language. Inconsistencies between the two create subtle quality issues in the output.
If your image prompt specifies "cinematic, dramatic lighting, moody atmosphere," your video motion prompt should use compatible language: "cinematic camera movement, dramatic atmosphere, moody pacing." Do not pair a dramatic, cinematic image with a "playful, bouncy, energetic" motion prompt -- the tonal mismatch confuses the model and degrades coherence.
Here is a quick reference for consistent prompt pairing:
| Image Style | Compatible Motion Language |
|---|---|
| Cinematic, dramatic | "Cinematic camera movement, dramatic pacing, slow and deliberate" |
| Bright, commercial, clean | "Smooth, professional motion, steady pacing, clean transitions" |
| Dreamy, ethereal, soft | "Gentle, floating movement, dreamy atmosphere, slow drift" |
| High-energy, dynamic | "Dynamic camera motion, energetic pacing, fast cuts" |
| Documentary, natural | "Handheld feel, natural movement, observational pacing" |
Tip 5: Save Your Best Pipelines
When a prompt-to-image-to-video chain produces great results, save the entire pipeline:
- The image prompt (exact text)
- The style settings you selected
- The image generation settings (aspect ratio, model, seed if available)
- The video motion prompt
- The video generation settings (duration, resolution)
This pipeline becomes a template. Need to create a similar video for a different product? Swap the subject in the image prompt and regenerate. Need the same style for a different scene? Keep the style keywords and change the subject description.
Over time, you build a library of proven pipelines for different creative objectives: product commercials, social media content, brand storytelling, cinematic B-roll, character animation. Each new project starts from a proven foundation instead of from scratch.
Alternative Tools for Each Pipeline Stage
Seedance offers the integrated pipeline, but you can build this workflow with separate tools. Here is an honest comparison of the options for each stage.
Stage 1: Prompt Generation
| Tool | Best For | Notes |
|---|---|---|
| Seedance Image Prompt Generator | Integrated pipeline, 12 style presets | 2 credits per prompt. Direct feed into Seedance image tools. |
| ChatGPT / GPT-4 | Custom prompt engineering | Requires manual copy-paste. No style presets. More flexible for complex instructions. |
| Claude | Nuanced, detailed prompts | Strong at following complex creative briefs. No image generation integration. |
| PromptHero | Browsing proven prompts by others | Community-driven. Good for inspiration. Not personalized to your project. |
Stage 2: Image Generation
| Tool | Best For | Notes |
|---|---|---|
| Seedance Text-to-Image / Image-to-Image | Pipeline integration, video-first workflow | Images transfer directly to video stage. No quality loss. |
| Midjourney | Artistic quality, aesthetic polish | Excellent output quality. Requires Discord or web interface. Manual download for pipeline. |
| DALL-E 3 | Prompt adherence, text rendering | Good at following complex prompts literally. Limited style control. |
| Stable Diffusion | Full control, local generation | Maximum flexibility. Requires technical setup. Best for high-volume work. |
Stage 3: Video Generation
| Tool | Best For | Notes |
|---|---|---|
| Seedance Image-to-Video | Integrated pipeline, consistent quality | Seamless image transfer. Supports first frame input directly. |
| Kling 3.0 | Long duration, high quality | Up to 2 minutes per generation. Strong motion quality. Separate platform. |
| Runway Gen-4 | Precision control, motion brush | Director Mode for camera paths. Professional interface. Higher price point. |
| Pika 2.0 | Simplicity, quick experiments | Easiest interface. Good for beginners. Less control over motion specifics. |
The honest take. You absolutely can build a high-quality pipeline using ChatGPT for prompts, Midjourney for images, and Runway for video. Many professionals do. The Seedance advantage is not that any individual stage is dramatically superior -- it is that the integration eliminates friction, preserves quality across transfers, and collapses three separate workflows into one. For creators who produce AI video regularly, the time saved by staying in one platform compounds into hours per week.
For a detailed comparison of video generation tools specifically, see our Best AI Video Generators 2026 Comparison.
Common Pipeline Mistakes
These are the five most frequent errors we see from creators building the prompt-to-image-to-video pipeline. Each one has a straightforward fix.
Mistake 1: Skipping the Image Stage Entirely
The error: Going directly from text to video, bypassing image generation completely.
Why it hurts: You lose all compositional control. The video model decides what everything looks like, how the scene is framed, and where the camera starts. The result is unpredictable and rarely matches your creative vision on the first try.
The fix: Always generate a first frame image, even if you think your text prompt is detailed enough. The 30 seconds it takes to generate an image saves you multiple failed video generations.
Mistake 2: Using Found Images Without Understanding Their Composition
The error: Downloading a random image from Google or a stock library and feeding it directly into video generation without evaluating whether it works as a first frame.
Why it hurts: Many photographs are composed for static viewing, not for motion. Tight crops leave no room for camera movement. Centered subjects limit orbiting. Flat lighting produces boring video. Heavily compressed JPGs introduce artifacts.
The fix: Evaluate any image against the "design for motion" principles before using it. Better yet, generate a purpose-built first frame using the pipeline.
Mistake 3: Mismatched Aspect Ratios
The error: Generating a square image and then creating a 16:9 video, or generating a landscape image for a vertical video.
Why it hurts: The video model must either crop your image (losing content you carefully composed) or invent content to fill the new aspect ratio (adding lower-quality AI-generated edges).
The fix: Decide on your final video's aspect ratio before generating the image. Generate the image in that exact aspect ratio.
Mistake 4: Over-Describing Motion in the Video Prompt
The error: Writing a video prompt that describes both the visuals and the motion: "A luxury watch on dark marble with dramatic lighting, the camera orbits slowly and light reflections dance across the surface."
Why it hurts: The visual description can conflict with what is already in the image. If the image has the watch on white marble but your prompt says dark marble, the model receives contradictory signals. At best, the visual description is redundant. At worst, it causes the model to modify your carefully composed first frame.
The fix: In the video prompt, describe only motion, camera, and atmosphere. The image already handles the visuals. Think of it as: the image is what you see, the video prompt is how it moves.
Mistake 5: Not Iterating on the Image Before Generating Video
The error: Generating one image and immediately sending it to video generation, even if the image has visible issues -- slightly off composition, minor artifacts, imperfect lighting.
Why it hurts: Video amplifies every flaw in the source image. A small artifact in a still frame becomes a persistent, moving artifact across 120 frames. Slightly off composition becomes noticeably wrong when camera motion draws attention to the framing. Every imperfection in the image is more visible, not less, once the video is in motion.
The fix: Treat the image stage as the quality gate. Do not proceed to video until the image is genuinely good. Iterate 3--5 times. Use image-to-image refinement for targeted fixes. The video output cannot exceed the quality of its source image.
Frequently Asked Questions
Why should I use images instead of going directly to text-to-video?
Text-to-video asks the AI to simultaneously create visuals and motion from words alone, which means you have minimal control over composition, character appearance, lighting, and framing. The image-first approach separates these tasks: you perfect the visuals in the image stage, then only ask the AI to add motion. This produces more predictable, higher-quality results because the AI has a concrete visual reference instead of interpreting ambiguous text. The improvement is particularly dramatic for professional use cases where specific compositions, brand colors, or character consistency matter.
What is the complete workflow for creating AI video from scratch?
The full workflow has three stages. Stage 1: Use an AI prompt generator (like Seedance's Image Prompt Generator) to expand your concept into a detailed image prompt. Stage 2: Use that prompt in a text-to-image tool (like Seedance's Text-to-Image) to generate a high-quality reference image. Iterate until the image is perfect. Stage 3: Upload the image to an image-to-video tool (like Seedance's Image-to-Video), write a motion-only prompt describing camera movement and subject action, and generate. The entire process takes 5--15 minutes depending on how many iterations you need at the image stage.
How many credits does the full pipeline cost on Seedance?
The cost varies by generation settings, but a typical pipeline run looks like this: prompt generation costs 2 credits, image generation costs 4--8 credits per attempt (expect 3--5 attempts for iteration, so 12--40 credits), and video generation costs 10--30 credits depending on duration and resolution. A complete pipeline from concept to finished video typically costs 25--70 credits total. This is significantly less than the cost of using three separate tools with three separate subscriptions.
Can I use images from other tools in Seedance's video generator?
Yes. Seedance's Image-to-Video tool accepts any uploaded image -- it does not need to be generated by Seedance. You can create images in Midjourney, DALL-E, Stable Diffusion, or any other tool and upload them as first frames. The integrated pipeline is convenient because it avoids download-upload cycles, but it is not a requirement. For best results with external images, use PNG format at 1024x1024 resolution or higher to avoid compression artifacts affecting the video output.
What aspect ratio should I use for the image stage?
Always match the image aspect ratio to your intended video output. Use 16:9 for landscape videos (YouTube, presentations, website embeds), 9:16 for vertical videos (Instagram Reels, TikTok, YouTube Shorts), and 1:1 for square videos (Instagram feed posts, some social ads). Generate the image in the correct aspect ratio from the start. Do not generate a square image and expect the video tool to convert it to 16:9 -- this either crops your composition or adds AI-generated content at the edges, both of which degrade quality.
How do I create first and last frames for a video?
Generate both frames using the pipeline. For the first frame, run the standard workflow: generate a prompt, create the image, iterate until it is right. For the last frame, use Image-to-Image with the first frame as the reference and describe the changes for the end state. This ensures visual consistency -- same location, same lighting direction, same color palette, but with the narrative changes you want (different time of day, different activity, different mood). Upload both frames to the video generator and let the AI create the transition. For a complete guide on this technique, see our First and Last Frame Guide.
Is this workflow suitable for commercial content?
Yes. The three-stage pipeline is already used by e-commerce brands for product videos, marketing teams for ad creatives, real estate firms for property showcases, and content agencies for social media production. The quality of 5--15 second AI video from high-quality first frames meets professional standards for digital content. The key for commercial use is investing time in the image stage -- a polished first frame translates directly into a polished video. For longer-form or broadcast commercial content, AI video is increasingly used for ideation and pre-visualization, with final production still handled traditionally for maximum control.
What if my generated image has artifacts?
Do not proceed to video generation. Artifacts in the source image are amplified in video -- a slightly warped hand in a still image becomes a noticeably malformed hand across 120 moving frames. Instead, fix the image first. Use Image-to-Image to regenerate the affected area while preserving the rest of the composition. If the artifact is severe (malformed anatomy, impossible geometry), regenerate the image entirely with a modified prompt that avoids the issue. Common artifact-prone elements include hands (specify "hands resting at sides" or "hands in pockets" to avoid complex finger poses), text (avoid including text in generated images), and reflections (simplify reflective surfaces in your prompt). Only proceed to video when the image is artifact-free.
Start Building Your Creative Pipeline
The three-stage pipeline -- prompt to image to video -- is the most reliable way to produce high-quality AI video in 2026. It separates the creative control you need (what the scene looks like) from the generative power you want (how it moves), and the result is video that matches your vision instead of the AI's best guess.
Every video starts with a great image. Every great image starts with a great prompt. Build the foundation right and the rest follows.
Step 1: Generate your prompt --> -- turn your concept into a professional image prompt with Seedance's AI Prompt Generator.
Step 2: Create your image --> -- generate and iterate on the perfect first frame for your video.
Step 3: Generate your video --> -- transform your image into a dynamic video clip with motion, camera movement, and atmosphere.
Learn first frame techniques --> -- master reference image design for maximum control over AI video.
Related reading: Image-to-Video AI Guide | First & Last Frame Guide | Text-to-Image AI Complete Guide | Image-to-Image AI Guide | AI Image Prompt Generator Guide | Best AI Image Generators 2026 | Best AI Video Generators 2026