
TL;DR
First and last frames are the most powerful controls you have in AI video generation. A well-designed reference image dramatically improves video quality, character consistency, and storytelling -- transforming AI video from an unpredictable experiment into a directed creative tool.
The first frame tells the AI exactly what your scene looks like: the subject, the lighting, the composition, the mood. The last frame tells the AI where the scene should end up, defining the motion trajectory and narrative arc between two known states. Together, they turn a black-box generation process into something you can reliably direct.
Seedance supports first frame upload in image-to-video, with a unique advantage: you can generate those reference frames using the built-in AI Image Generator or Text-to-Image tool -- creating a complete pipeline from idea to finished video without leaving the platform.
Generate your first frame --> | Create video from an image --> | Design prompts for perfect frames -->
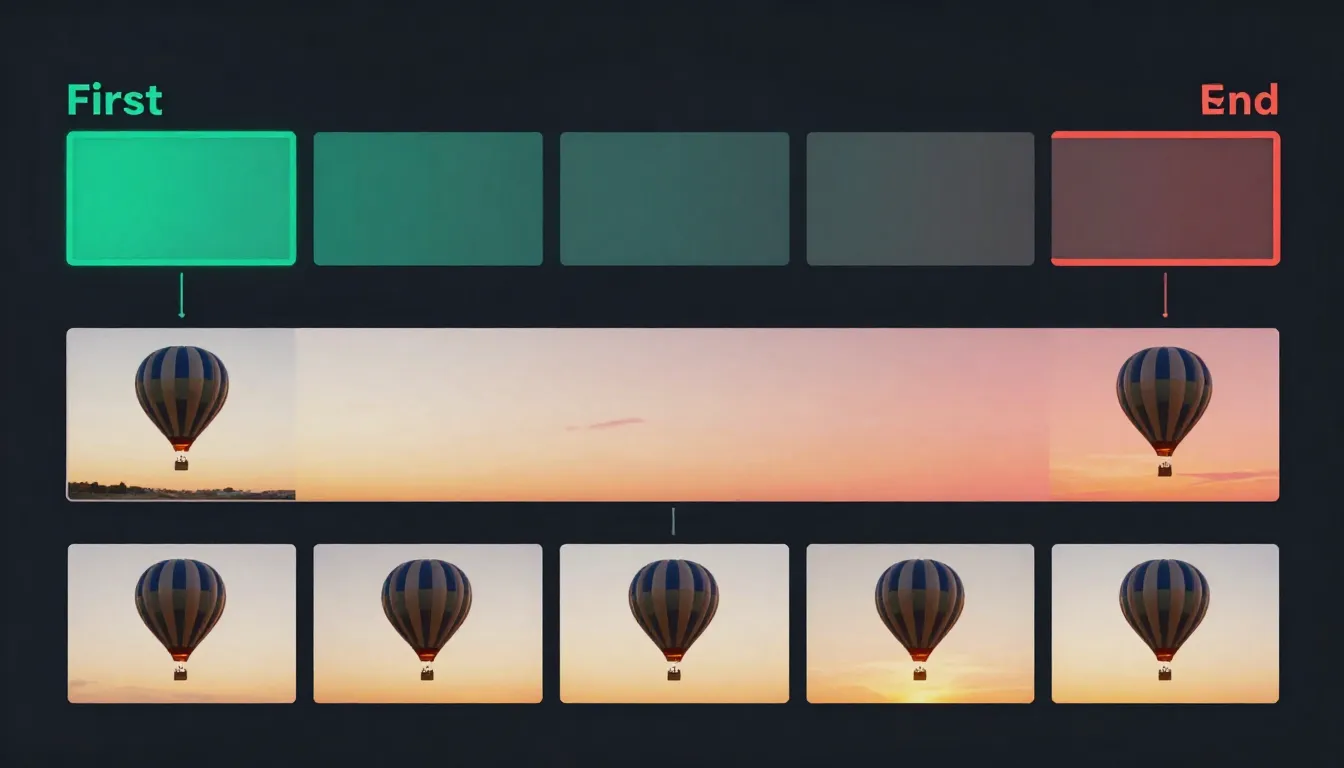
First and last frames act as visual anchors for AI video generation. The first frame defines where the video starts; the last frame defines where it ends. The AI generates all the motion in between.
What Are First and Last Frames in AI Video?
In AI video generation, first frame and last frame refer to reference images that define the starting point and ending point of a generated video clip. Instead of giving the AI nothing but a text description and hoping for the best, you provide one or two concrete visual anchors that constrain and guide the entire generation process.
First Frame: Your Visual Starting Point
The first frame is an image that tells the AI exactly what the opening shot of your video should look like. When you upload a first frame, you are defining:
- Subject identity: What the character or object looks like -- facial features, clothing, body type, pose
- Scene composition: Where elements are positioned within the frame
- Environment: The setting, background, and spatial context
- Lighting direction and quality: Where light is coming from, how hard or soft it is, what color temperature
- Color palette: The overall color grading and mood of the video
- Camera position: The initial camera angle and distance from the subject
Every single one of these elements carries forward through the generated video. The first frame is not a suggestion -- it is a specification.
Last Frame: Your Visual Destination
The last frame is an image that tells the AI where the video should end up. When you provide both a first and last frame, the AI knows two things with certainty: point A and point B. Its job is to generate the most natural, visually coherent path between them.
The last frame defines:
- Motion trajectory: How the subject should move from their starting position to their ending position
- Narrative arc: The story told between the two states (opening a door, turning around, a flower blooming)
- Environmental changes: Shifts in lighting, time of day, or atmosphere between start and end
- Camera path: How the camera moves from its initial position to its final position
Why Reference Frames Transform AI Video Quality
Without reference images, text-to-video generation is essentially a black box. You type a description, and the AI interprets it according to its training data. The result might be stunning or it might be completely wrong. You have no visual control over what the subject looks like, how the scene is lit, or where the camera starts.
With a first frame, you eliminate most of that uncertainty. The AI already knows what the scene looks like -- its only job is to generate plausible motion. This is a fundamentally easier task for the model, which is why image-to-video consistently produces higher-quality, more predictable results than text-to-video alone.
With both first and last frames, you go even further. The AI is no longer guessing where things should end up. It has two confirmed states and needs only to interpolate between them. This produces smoother, more intentional motion with far fewer artifacts or unexpected deviations.
The difference is comparable to navigation. Text-to-video is like telling a driver "go somewhere nice." First frame guidance is like telling them "start at this specific intersection." First plus last frame guidance is like giving them the exact starting address, the exact destination, and letting them choose the best route between them.
For a complete overview of image-to-video fundamentals, see our Image-to-Video AI Guide.
Why First Frame Quality Determines Video Quality
This is the single most important principle in reference-frame video generation: the quality of your first frame directly determines the quality of your entire video. Not partially. Not approximately. Directly and completely.
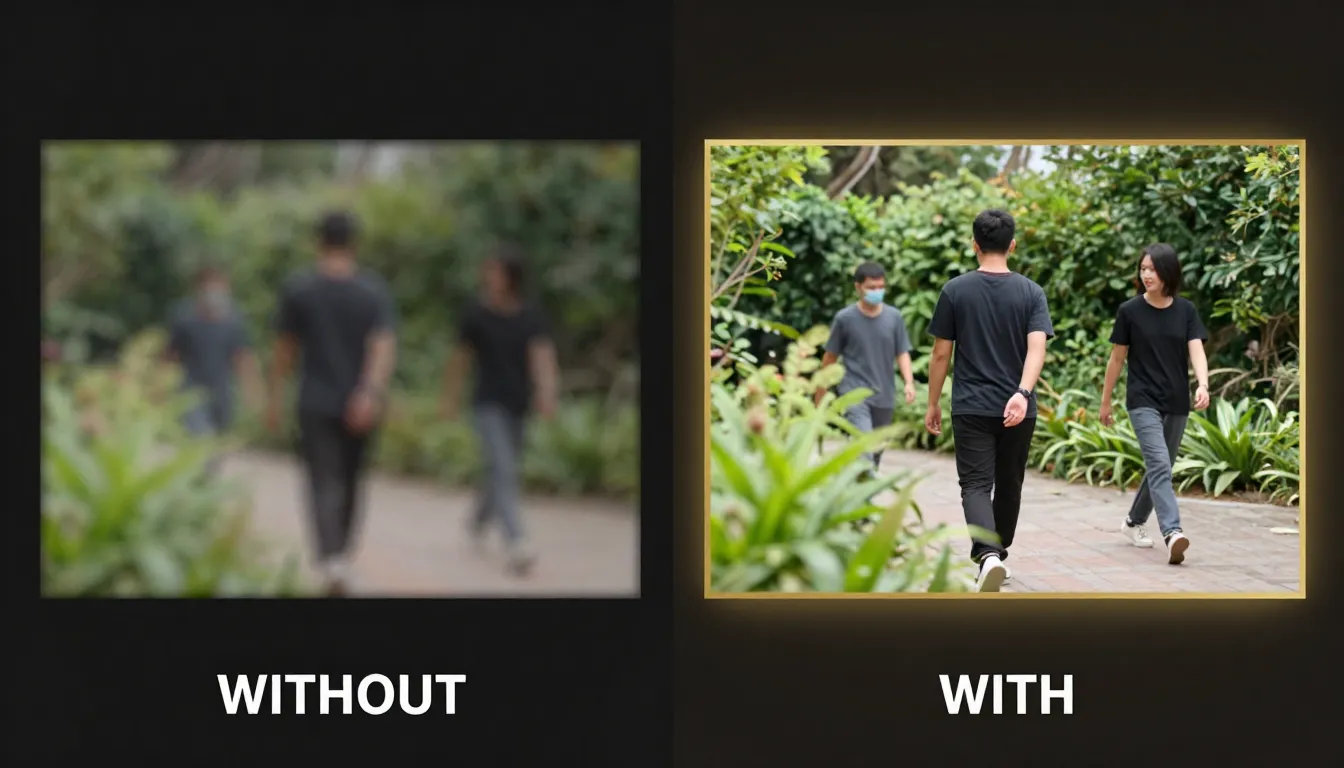
Same prompt, different first frames. Left: a low-resolution, poorly composed first frame produces inconsistent faces and broken environments. Right: a sharp, well-designed first frame produces coherent motion and professional-quality video.
The First Frame Sets Everything
When an AI video model receives your first frame, it encodes it into a rich latent representation -- a mathematical fingerprint that captures every visual detail. This encoding becomes the foundation that every subsequent generated frame builds upon.
Character identity is locked in at the first frame. If you provide a clear, well-lit portrait with distinct facial features, the model maintains that identity throughout the video. If the first frame has a blurry face, indistinct features, or harsh shadows obscuring key details, the model has insufficient information to maintain consistency. The result: faces that morph, shift, or lose their identity mid-video.
Scene composition propagates from the first frame. A well-composed first frame with clear foreground, midground, and background gives the model depth information it can use for parallax effects and natural camera movement. A flat, poorly composed first frame leaves the model guessing about spatial relationships, leading to unnatural depth perception in the output.
Color grading and mood are inherited directly. The exact color palette, contrast levels, and atmospheric quality of your first frame persist through every generated frame. If the first frame has a warm golden-hour glow, the video maintains that warmth. If the first frame has flat, overcast lighting, that flatness carries through.
Lighting quality determines shadow behavior for the entire clip. Coherent, well-defined lighting in the first frame means the model can predict how shadows should move as subjects change position. Inconsistent or confusing lighting in the first frame causes shadow artifacts that accumulate across frames.
The Extrapolation Problem
AI video models do not generate each frame independently. They extrapolate motion sequentially -- each new frame is generated based on the frames that came before it, with the first frame as the original anchor. This means errors compound. A small inconsistency in frame 2 becomes a larger inconsistency in frame 10 and a major artifact by frame 30.
A high-quality first frame minimizes the seed errors. The model has clear, unambiguous information to extrapolate from, so each subsequent frame stays closer to the intended output. A poor first frame introduces ambiguity from the very start, and that ambiguity grows with every frame.
This is why investing time in your first frame pays off exponentially. Five extra minutes spent perfecting your reference image can save hours of regeneration attempts.
What Makes a First Frame "Good" for Video
Not every technically good photograph makes a good first frame for AI video. A stunning still photo might have characteristics that actively work against video generation. Here is what separates a good photograph from a good first frame:
- Motion space: Good first frames leave room for the subject to move. A tightly cropped headshot filling the entire frame leaves no room for the subject to turn, nod, or shift.
- Implied physics: The best first frames contain visual cues about how things should move. Hair positioned as if wind is blowing, fabric draping under gravity, water at the moment before it splashes -- these cues guide the motion model.
- Stable elements: Areas that should remain static need to be clearly defined. A cluttered background with ambiguous depth makes it harder for the model to decide what should move and what should stay still.
- Appropriate complexity: The scene should match what the video model can handle. One or two main subjects with a coherent background produce far better results than a crowd scene with dozens of moving elements.
How First & Last Frame Works (Technical Overview)
Understanding the technical mechanisms helps you make better creative decisions. You do not need to be an ML engineer, but knowing how the model uses your reference images explains why certain approaches work and others do not.
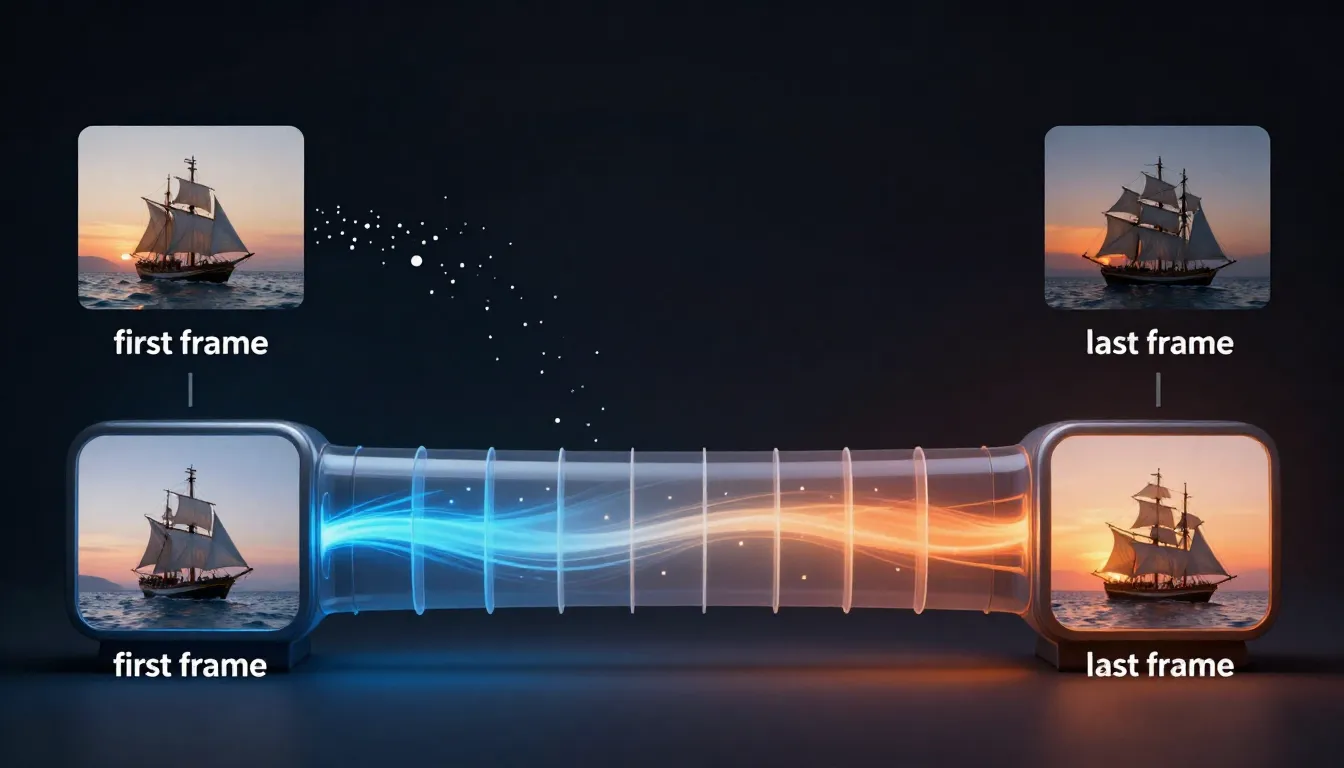
How first and last frames condition the video diffusion model: the reference images are encoded into latent space, motion is predicted between the two states, and the diffusion process generates temporally consistent intermediate frames.
Image Conditioning in Video Diffusion Models
Modern AI video generators are built on video diffusion models -- neural networks that learn to generate video by gradually denoising random noise into coherent frame sequences. When you provide a first frame, it acts as a conditioning signal that constrains the denoising process.
In technical terms, the first frame is encoded into a latent vector by an image encoder (typically a VAE -- Variational Autoencoder). This latent vector is then injected into the diffusion model at multiple stages, ensuring that every generated frame maintains visual consistency with the original reference.
Think of it this way: without a first frame, the diffusion model starts from pure noise and has to simultaneously figure out what the scene looks like AND how things should move. With a first frame, the "what does the scene look like" question is already answered. The model can dedicate its full capacity to generating natural motion.
First Frame Injection
When only a first frame is provided (no last frame), the model operates in forward extrapolation mode. It takes the encoded first frame and generates subsequent frames by predicting the most likely motion that would follow from that initial state.
The model uses several mechanisms to maintain consistency:
- Cross-attention layers: These allow each generated frame to "look back" at the encoded first frame, checking that subjects maintain their identity and the scene stays coherent
- Temporal attention: Generated frames attend to each other as well, ensuring smooth transitions and consistent motion between neighboring frames
- Classifier-free guidance: The text prompt steers the motion direction, while the first frame constrains the visual content
The practical implication: the further a generated frame is from the first frame (in time), the more it can drift from the original reference. This is why short clips (5-10 seconds) maintain much tighter consistency than long clips (30+ seconds). The first frame's influence gradually decreases as more frames are generated.
Last Frame Targeting
When both a first and last frame are provided, the model switches to interpolation mode. Instead of extrapolating forward from a single anchor, it generates frames that form a plausible path between two known states.
This is technically a more constrained problem, which means:
- Better motion coherence: The model knows where things need to end up, so it can plan the motion trajectory
- Reduced drift: There is no gradual loss of reference signal -- the model has anchors at both ends
- More predictable results: With two constraints instead of one, the space of possible outputs is much smaller
The interpolation process works by encoding both frames into latent space, computing the difference between them, and distributing that change across the generated frame sequence. The model then uses diffusion to fill in the visual details of each intermediate frame, ensuring smooth transitions.
Consistency Mechanisms
Beyond the basic conditioning, modern video models employ several techniques specifically designed to maintain visual consistency across frames:
Reference attention (IP-Adapter style): Some models maintain a persistent feature map extracted from the first frame that every generated frame cross-attends to. This is particularly effective for maintaining face identity and fine-grained details.
Optical flow estimation: The model internally estimates how pixels should move between frames, using this flow field to warp features from the first frame into subsequent frames before applying diffusion refinement. This ensures structural consistency even as subjects move.
Temporal convolutions: 3D convolutional layers process multiple frames simultaneously, enforcing local temporal coherence so that neighboring frames look smooth and connected.
What the Model Can and Cannot Do
What it can reliably control:
- Motion direction and general trajectory (subject walking left, turning right)
- Camera movement type (pan, zoom, orbit, dolly)
- Motion speed and pacing (slow, steady, dynamic)
- Environmental motion (wind, water, clouds)
What it cannot guarantee:
- Exact pixel-level accuracy of the last frame (the endpoint will be close but not identical)
- Complex multi-step actions (a person catching a ball, then throwing it)
- Physical accuracy in novel situations (the model learned from training data, not physics simulations)
- Maintaining small text or intricate patterns across motion
Honest Limitations
No reference-frame system is perfect. Here are the real-world limitations you should be aware of:
Temporal drift: Even with excellent first frames, video models can gradually drift over longer durations. A 5-second clip stays very consistent; a 30-second clip may show noticeable changes in face structure or scene details. This is an active area of research, and each new model generation improves, but it remains a fundamental challenge.
Motion complexity ceiling: Current models handle 1-2 simultaneous actions well (a person walking while the camera pans). Adding more simultaneous motions increases the likelihood of artifacts. If you need complex choreography, generate shorter segments and edit them together.
Last frame accuracy: When providing a last frame, the generated video will move toward it, but the final generated frame may not match the reference exactly. Think of the last frame as a strong directional guide, not a pixel-perfect constraint.
Style shifts: If your first and last frames have slightly different lighting or color grading, the model will attempt to transition between them. This can produce unintended color shifts mid-video. For the smoothest results, keep first and last frame styles as consistent as possible.
Designing the Perfect First Frame
Creating a first frame that maximizes video quality is a craft in itself. It combines traditional photography and cinematography principles with an understanding of what AI video models need to produce their best work.
The four pillars of first frame design: composition with motion space, subject design for consistency, lighting and color for mood control, and resolution matching for optimal output.
Composition Rules for Video-Ready Images
Static image composition and video composition serve different goals. A photograph is a self-contained moment. A first frame is the beginning of a story -- it needs to leave room for what happens next.
Rule of thirds with motion space. Apply the standard rule of thirds, but position your subject on the side opposite to where they will move. If the subject will walk to the right, place them on the left third of the frame. If the camera will pan left, compose with extra space on the left side. This "lead room" gives the AI space to create natural motion without running into frame boundaries.
Depth layers matter more than in still photography. Include clear foreground, midground, and background elements. These depth layers give the AI parallax information -- when the camera moves, closer objects should shift more than distant ones. A flat image with no depth variation produces flat, unconvincing camera movement.
Avoid edge-to-edge subjects. If your subject fills the entire frame with no margin, the AI has no room to add camera movement, subtle subject shifts, or environmental motion at the edges. Leave at least 10-15% padding around your subject. This is especially important if you plan to specify any camera movement in your prompt.
Consider the intended camera motion when composing. If you plan a zoom-in, ensure the center of the frame is the most detailed and interesting area. If you plan a pan, ensure both sides of the frame have enough visual information for smooth motion. If you plan a dolly shot, ensure the depth layers are well-defined.
Asymmetry creates visual interest. Perfectly centered, symmetrical compositions can produce static-looking video. A slight asymmetry gives the AI a more natural starting point and makes the resulting motion feel more organic.
Subject Design for Consistency
The way you design (or choose) your subject in the first frame directly affects how well the AI maintains that subject's identity throughout the video.
Clear, well-lit faces for character videos. If the video focuses on a person, their face needs to be clearly visible with even lighting. Harsh shadows across the face, obscured features, or extreme angles make it harder for the model to maintain facial identity. Front-lit or three-quarter-lit portraits with both eyes visible produce the best consistency.
Distinctive clothing and accessories. AI models use visual cues like clothing color, patterns, and accessories to track identity across frames. A character wearing a plain gray shirt against a gray background gives the model very little to work with. A character with a distinct red jacket, a specific hairstyle, and recognizable accessories is much easier for the model to track and maintain.
Avoid complex patterns that might confuse the model. Herringbone, moiré-prone patterns, very fine stripes, or intricate geometric patterns can alias and flicker in video output. Solid colors, subtle textures, and broad patterns work much better for first frames.
Match complexity to purpose. Simple backgrounds for character-focused videos, where the subject should dominate attention and the background should remain stable. Detailed environments for landscape or architectural videos, where the environment IS the subject and the AI should animate the entire scene.
Lighting and Color for Mood Control
The first frame's lighting is perhaps its most influential characteristic. Every shadow, highlight, and color cast in the first frame will persist and propagate through every generated frame. Choose your lighting with the same intentionality you would use when lighting a film set.
Golden hour lighting produces warm, cinematic video with long shadows and rich skin tones. The directional quality of golden hour light gives the AI strong cues for shadow behavior during motion.
Overcast or diffused lighting produces even, commercial-style video. Minimal shadows mean the AI has less shadow consistency to maintain, which can actually improve output quality for complex scenes.
Studio lighting with controlled key, fill, and rim lights produces clean, professional-looking video suitable for product shots, headshots, and commercial content. The controlled nature of studio lighting translates well to consistent video output.
Neon and dramatic lighting produces stylized, moody video with strong color contrasts. This works well for creative and entertainment content but increases the risk of color inconsistencies in the generated frames, since the model must maintain complex lighting interactions.
Color palette is inherited directly. If your first frame is graded with teal-and-orange, the entire video will carry that palette. If it is desaturated and moody, the video will be desaturated and moody. Choose your color palette for the first frame as if you are choosing the color grade for the entire final video.
Resolution and Aspect Ratio
Technical specifications matter just as much as creative decisions.
Match the first frame resolution to the target video resolution. If you want 1080p output, provide at least a 1920x1080 first frame. Higher resolution is better -- the encoder extracts more detail from a 2048x2048 image than a 1024x1024 one, even if the output resolution is the same.
Common aspect ratios and their best uses:
| Aspect Ratio | Dimensions | Best For |
|---|---|---|
| 16:9 | 1920x1080 | YouTube, websites, presentations, cinematic content |
| 9:16 | 1080x1920 | TikTok, Instagram Reels, YouTube Shorts, mobile-first content |
| 1:1 | 1080x1080 | Instagram feed, social ads, product showcases |
| 4:5 | 1080x1350 | Instagram posts, Facebook ads |
| 21:9 | 2560x1080 | Ultra-wide cinematic, banner videos |
Critically: match the first frame aspect ratio to the output video aspect ratio. Uploading a landscape first frame and requesting portrait video output forces the AI to crop dramatically or hallucinate missing content. Both produce subpar results. If you need a different aspect ratio than your source image, crop the source image first -- do not let the AI handle the mismatch.
Higher resolution first frames produce sharper video output. This is true up to a point. Most current models have an internal processing resolution (often 1024px or 1280px on the long side). Providing an image above this resolution does not hurt, but the returns diminish. Below this resolution, you will see a noticeable quality drop.
Using Last Frame for Storytelling
The last frame transforms AI video from "motion applied to an image" into "a short story told visually." By defining both where the video starts and where it ends, you are writing a visual narrative that the AI fills in with natural motion.
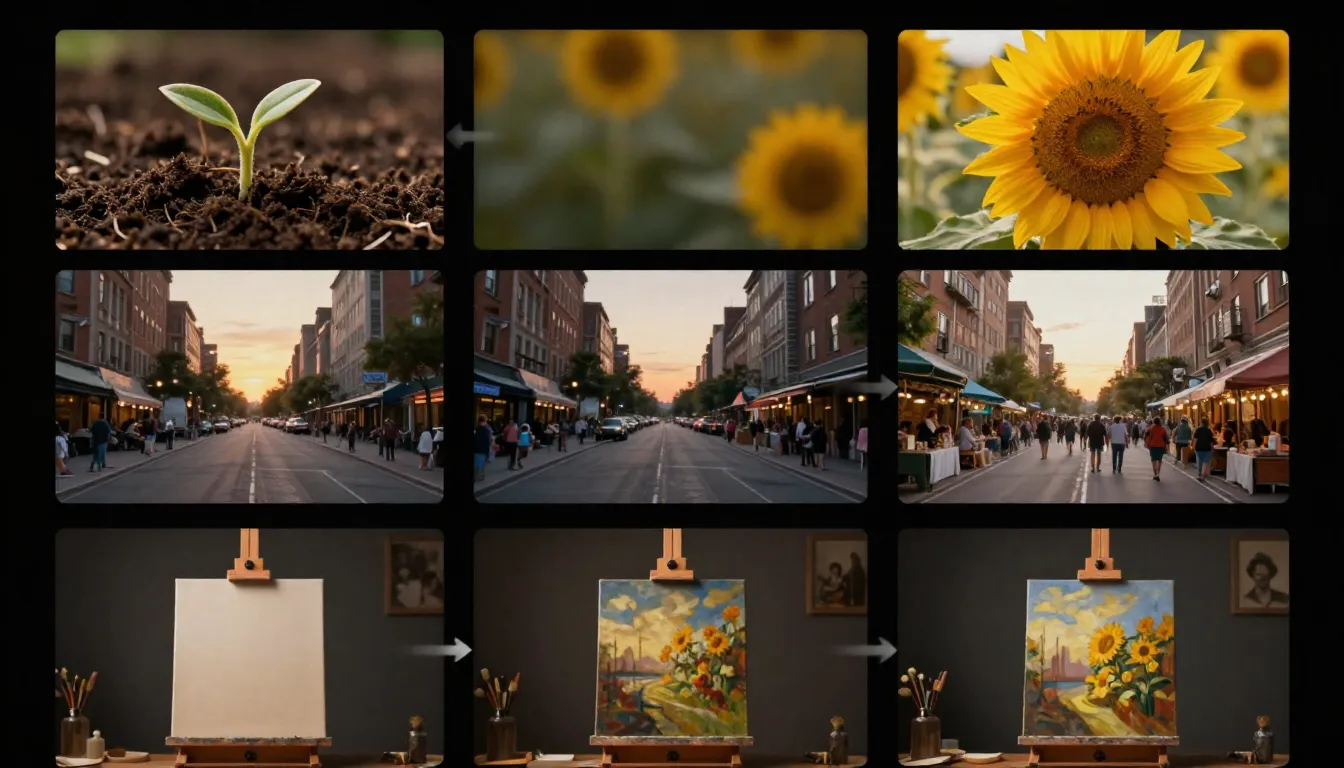
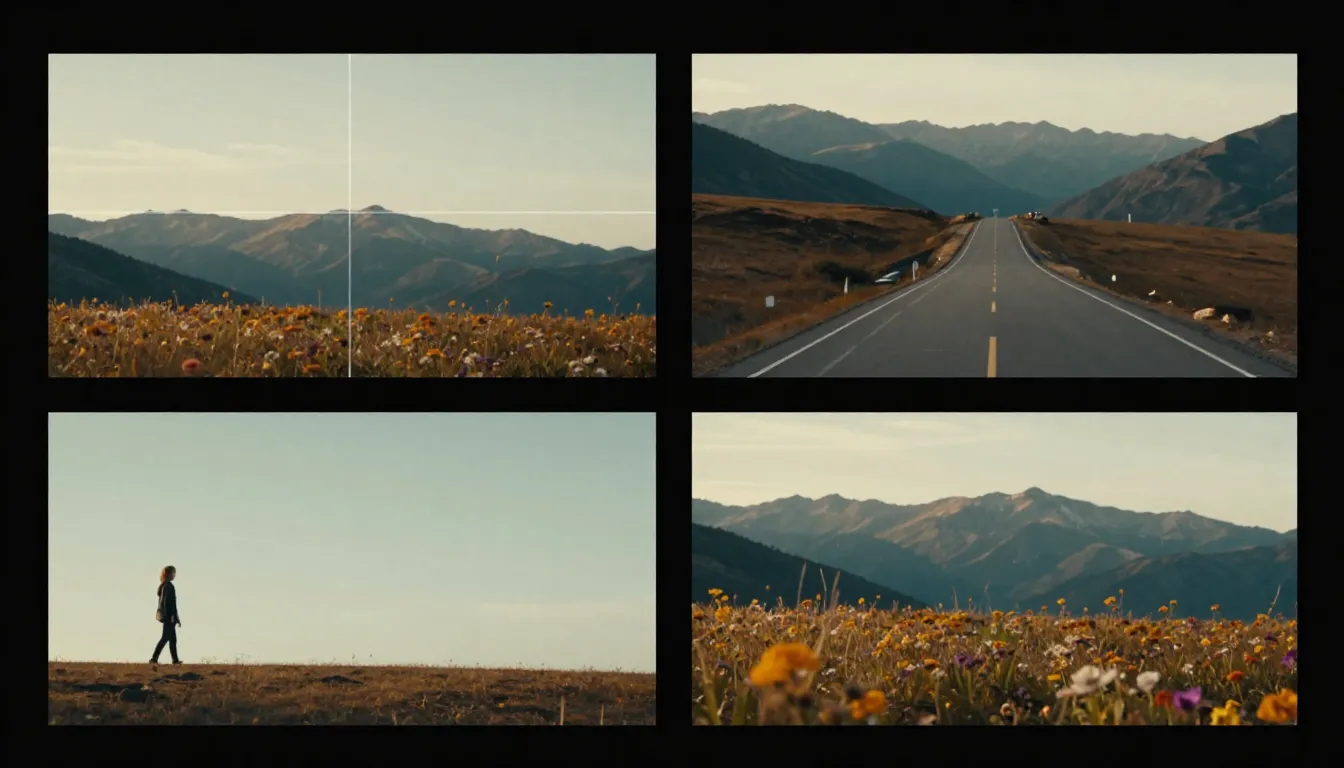
First and last frames define a narrative arc. Left: departure. Center: growth. Right: gathering. The AI generates all the motion between the two states, creating a visual story from just two images.
Defining the Narrative Arc
Every video, no matter how short, tells a micro-story. The first and last frames define the beginning and end of that story. The AI generates the middle -- the motion, the transitions, the unfolding of events between two known states.
Example: Narrative of Departure
- First frame: a person standing at a doorway, facing the camera
- Last frame: the same person walking down a path, seen from behind
- What the AI generates: the person turns, opens the door, walks through, and continues away from the camera
- Emotional tone: farewell, journey, moving on
Example: Narrative of Growth
- First frame: a closed flower bud on a stem, early morning light
- Last frame: the same flower fully bloomed, warm afternoon light
- What the AI generates: petals unfurling, light shifting, the flower opening to the sun
- Emotional tone: transformation, beauty, natural process
Example: Narrative of Gathering
- First frame: an empty table with place settings
- Last frame: the same table with people seated, mid-conversation
- What the AI generates: people entering the frame, pulling out chairs, settling in, the room coming to life
- Emotional tone: community, warmth, celebration
Example: Narrative of Reveal
- First frame: a gift box, wrapped and closed
- Last frame: the box open, the product visible inside
- What the AI generates: hands reaching for the box, lifting the lid, revealing the contents
- Emotional tone: anticipation, surprise, satisfaction
The key insight is that the space between two images is a story, and the AI is your storyteller. The more thoughtfully you choose those two anchor points, the more compelling the story becomes.
Last Frame Best Practices
Creating effective last frames requires a different mindset than creating first frames. The last frame must be different enough to create a narrative, yet similar enough that the AI can generate a smooth, believable transition.
Keep the same scene and environment. Do not change the location between first and last frames. If the first frame is in a kitchen, the last frame should be in the same kitchen. Changing locations requires a cut, which is not something the model can generate -- it will attempt to morph one location into another, producing surreal and usually unwanted results.
Maintain character identity. The person in the last frame should be the same person as in the first frame, wearing the same clothing, with the same hairstyle. The model will attempt to maintain identity regardless, but inconsistencies between your reference images create conflicting signals that degrade output quality.
Change only what should change. Be selective about what differs between the first and last frame. Changed elements the AI handles well:
- Position and pose: Subject moves from sitting to standing, turns to look in a different direction
- Expression: Subject goes from neutral to smiling, from thoughtful to excited
- Time of day: Lighting shifts from morning to evening (subtle is better)
- Object state: Door closed to open, box wrapped to unwrapped, candle lit to burned down
Subtle changes produce smoother results. A small head turn, a gentle shift in expression, a slight change in posture -- these produce beautifully smooth, natural-looking video. The AI does not have to invent much motion, so it can focus on making what it does generate look perfect.
Dramatic changes work better with longer durations. If the change between first and last frame is significant (person on one side of the room to the other, flower from bud to bloom), give the AI more time to work with. A dramatic change crammed into 3 seconds looks rushed and often produces artifacts. The same change spread over 10-15 seconds looks natural and cinematic.
Match the visual style between frames. Use the same camera angle (or very similar), the same color grading, the same lighting quality. If the first frame is shot with warm, soft light and the last frame has cool, hard light, the video will contain an unnatural lighting transition that undermines the storytelling.
When NOT to Use a Last Frame
Last frames are powerful but not always necessary. There are legitimate situations where providing only a first frame produces better results.
When you want the AI to surprise you. Sometimes the most creative results come from giving the AI a strong starting point and letting it extrapolate freely. This is particularly true for abstract, artistic, or experimental content where predictability is the enemy.
When the video is purely ambient. If you are generating a looping background video -- waves on a beach, clouds drifting, a fireplace flickering -- there is no narrative arc to define. The motion is cyclical and atmospheric. A first frame is sufficient; a last frame is unnecessary and can actually constrain the AI in unproductive ways.
When the first frame alone provides enough guidance. If your first frame strongly implies the motion that should follow -- a runner caught mid-stride, a ball at the top of its arc, a diver mid-jump -- the AI can extrapolate the expected motion accurately. Adding a last frame would be redundant and limits the AI's ability to generate the most natural physics-based motion.
When you do not have a coherent last frame. A poorly conceived last frame is worse than no last frame. If you are uncertain what the end state should look like, let the AI decide. You can always generate multiple variations and choose the one that best fits your vision.
5 First/Last Frame Workflows (With Examples)
Theory is useful, but practice is what produces results. Here are five complete workflows that cover the most common use cases for first and last frame video generation. Each workflow includes specific guidance on frame design, prompting, and the tools involved.
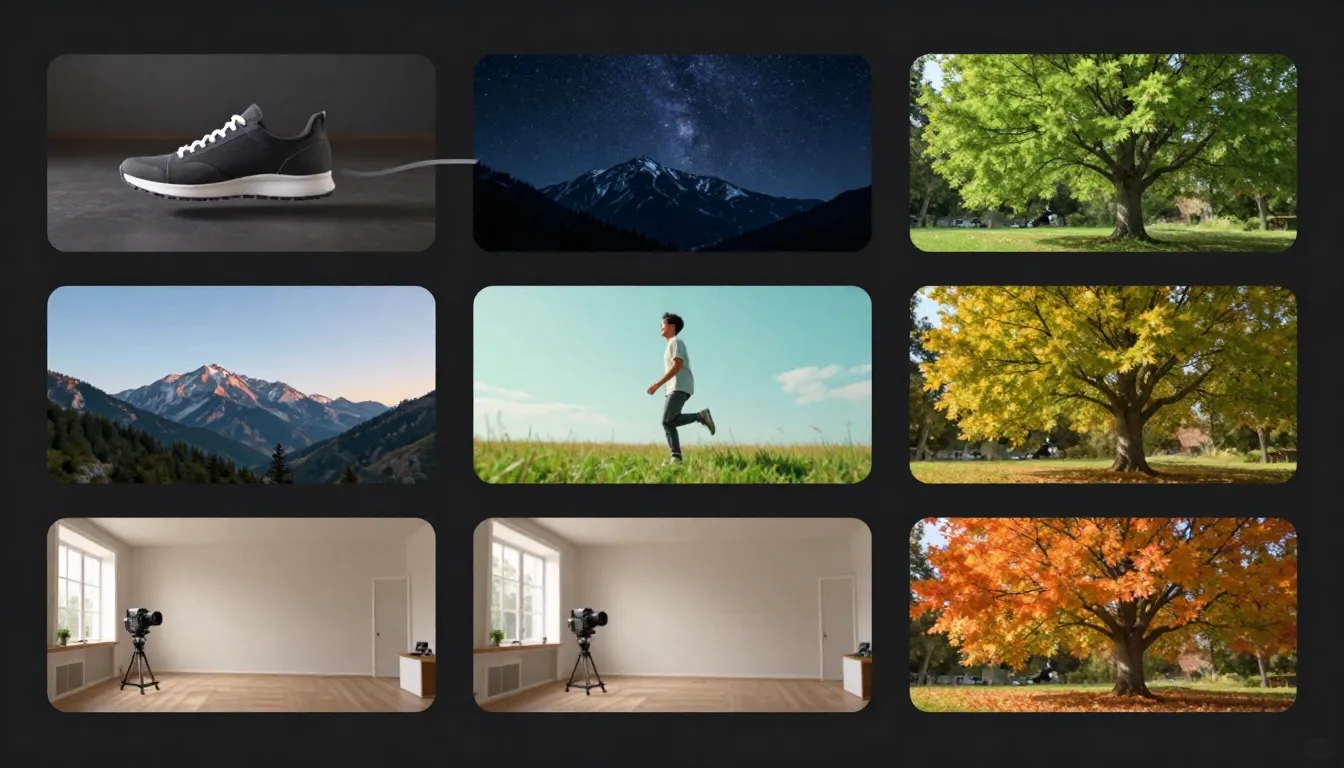
Five practical workflows demonstrating first and last frame video generation across different content types: character animation, product reveal, landscape time-lapse, action sequence, and emotional storytelling.
Workflow 1: Character Animation
Use case: Social media content, avatar animations, character-driven storytelling
First frame design: A portrait of a person looking directly at the camera. Medium close-up framing (head and shoulders visible). Soft, even lighting with a clean background. The face is fully visible, well-lit, with a neutral or slightly pleasant expression. Hair and clothing are clearly defined.
Last frame design: The same person, same framing, same background -- but now turned to look out a window to their right. Their body has rotated approximately 45 degrees. The expression has shifted from neutral to contemplative.
Prompt guidance:
The person slowly turns their head to the right, gazing out the
window. Gentle, natural movement. Soft light from the window
illuminates their face from the side. Hair moves slightly with
the turn. Smooth, steady camera. Cinematic film quality.
What makes this work: Character animation requires the model to maintain face identity throughout the motion. The clear, well-lit first frame gives the model strong facial feature data. The subtle rotation between first and last frame is easily achievable -- the model does not need to generate extreme motion, just a smooth turn.
Tools pipeline: Seedance Image Generator or Text-to-Image to create the portrait, then Image-to-Video to animate.
Workflow 2: Product Reveal
Use case: E-commerce product videos, unboxing content, product launches
First frame design: A premium product box or packaging, centered in frame on a clean surface. Studio lighting with a subtle gradient background. The packaging is closed and intact. Clean, commercial aesthetic.
Last frame design: The same scene, same lighting, same surface -- but the box is now open and the product is visible, positioned as a hero shot. The packaging has been pushed slightly aside to reveal the contents.
Prompt guidance:
Smooth product reveal. The box lid lifts open gracefully,
revealing the product inside. Dramatic studio lighting with soft
shadows. Camera slowly pushes in as the product is revealed.
Premium commercial quality. Clean, precise movements.
What makes this work: Product videos need precision and professionalism. The controlled studio environment is simple enough for the AI to handle perfectly. The motion is straightforward (open the box, reveal the product), and the clear visual difference between first and last frames gives the model an unambiguous trajectory.
Tools pipeline: Photograph your actual product, or use Text-to-Image to generate a product mockup. Feed into Image-to-Video for the final animation.
For more on AI product videos, see our E-Commerce Product Video Guide.
Workflow 3: Landscape Time-Lapse
Use case: Cinematic establishing shots, travel content, ambient background video
First frame design: A wide landscape shot during sunrise. The sky shows warm pink and orange tones low on the horizon. Mountains, water, or architecture provide clear foreground and background depth layers. Shot in 16:9 aspect ratio. High resolution with rich detail throughout the frame.
Last frame design: The exact same landscape and camera position -- but hours later. The sky is now deep blue and orange with the sun much lower or on the opposite horizon. Shadows have shifted dramatically. The overall color temperature has warmed.
Prompt guidance:
Gradual time passage across the landscape. Clouds drift slowly
across the sky. Sunlight shifts from sunrise to golden hour.
Shadows lengthen across the foreground. Water reflects the
changing sky colors. Static camera, no movement. Smooth,
hypnotic time-lapse quality.
What makes this work: Time-lapse is ideal for first/last frame generation because the spatial content stays the same -- only the lighting and atmosphere change. The model excels at interpolating lighting changes because lighting is encoded as a continuous parameter in latent space. The static camera instruction removes the complexity of camera motion, letting the model focus entirely on temporal transitions.
Tools pipeline: Use your own landscape photographs taken at different times, or generate a pair with Text-to-Image (specifying the same scene at different times of day). Upload the sunrise version as first frame to Image-to-Video.
Workflow 4: Action Sequence
Use case: Creative content, entertainment, sports marketing, dynamic social media
First frame design: A character in a ready position -- a dancer poised to leap, a skateboarder at the top of a ramp, an athlete in starting blocks. Dynamic composition with clear motion direction implied. Slightly lower camera angle to add drama. Sharp focus on the subject, with depth of field blurring the background.
Last frame design: The same character mid-action -- fully extended in the jump, mid-air during the trick, in full stride. The pose captures the peak moment of the action. Slight motion blur on extremities adds to the sense of movement.
Prompt guidance:
Dynamic burst of movement. The figure launches into action
with explosive energy. Cinematic slow motion capturing every
detail of the movement. Subtle motion blur on fast-moving limbs.
Camera tracks the action smoothly. Dramatic lighting emphasizes
the form. High-end sports commercial quality.
What makes this work: Action sequences benefit enormously from a last frame because the model knows exactly where the action should peak. Without a last frame, the AI might generate timid, unconvincing motion. The last frame gives it permission and direction to generate dramatic, full-body movement. The implied physics in both frames (starting crouch, mid-air peak) provide strong motion cues.
Tools pipeline: Use Text-to-Image to generate both the starting pose and the action peak. Import into Image-to-Video for the final dynamic clip.
Workflow 5: Emotional Storytelling
Use case: Brand storytelling, social media narrative content, short films
First frame design: A person sitting alone at a dining table. The table is set for multiple people, but the chairs are empty. Warm, slightly dim lighting. A sense of quiet solitude. The subject's expression is neutral or slightly pensive.
Last frame design: The same table, same person -- but now the other chairs are occupied by friends or family. The lighting is slightly warmer and brighter. The subject is mid-smile. Plates have food. The atmosphere has shifted from solitude to togetherness.
Prompt guidance:
People gradually enter the frame and take their seats at the
table. The atmosphere warms as the room fills with conversation.
The main subject's expression shifts from pensive to joyful.
Lighting brightens subtly. Natural, warm movement. Handheld
camera with gentle, organic motion. Emotionally resonant,
cinematic storytelling quality.
What makes this work: Emotional storytelling is the most sophisticated use of first/last frame generation. The narrative arc (loneliness to belonging) is clearly defined by the two frames. The model can interpolate not just the physical changes (people arriving, expression shifting) but the atmospheric changes (lighting warming, energy building). This produces video that genuinely evokes emotion -- something text-only prompts rarely achieve.
Tools pipeline: Generate both scenes with Text-to-Image, carefully maintaining the same environment and character design across both images. Use Image-to-Video for the final storytelling clip.
Creating First Frames with AI Image Generation
One of Seedance's most powerful advantages is that you do not need to rely on existing photographs for your first frames. You can generate custom reference images from scratch using the platform's suite of AI image tools -- then feed those directly into the video generator. This creates a complete idea-to-video pipeline that no other platform matches.
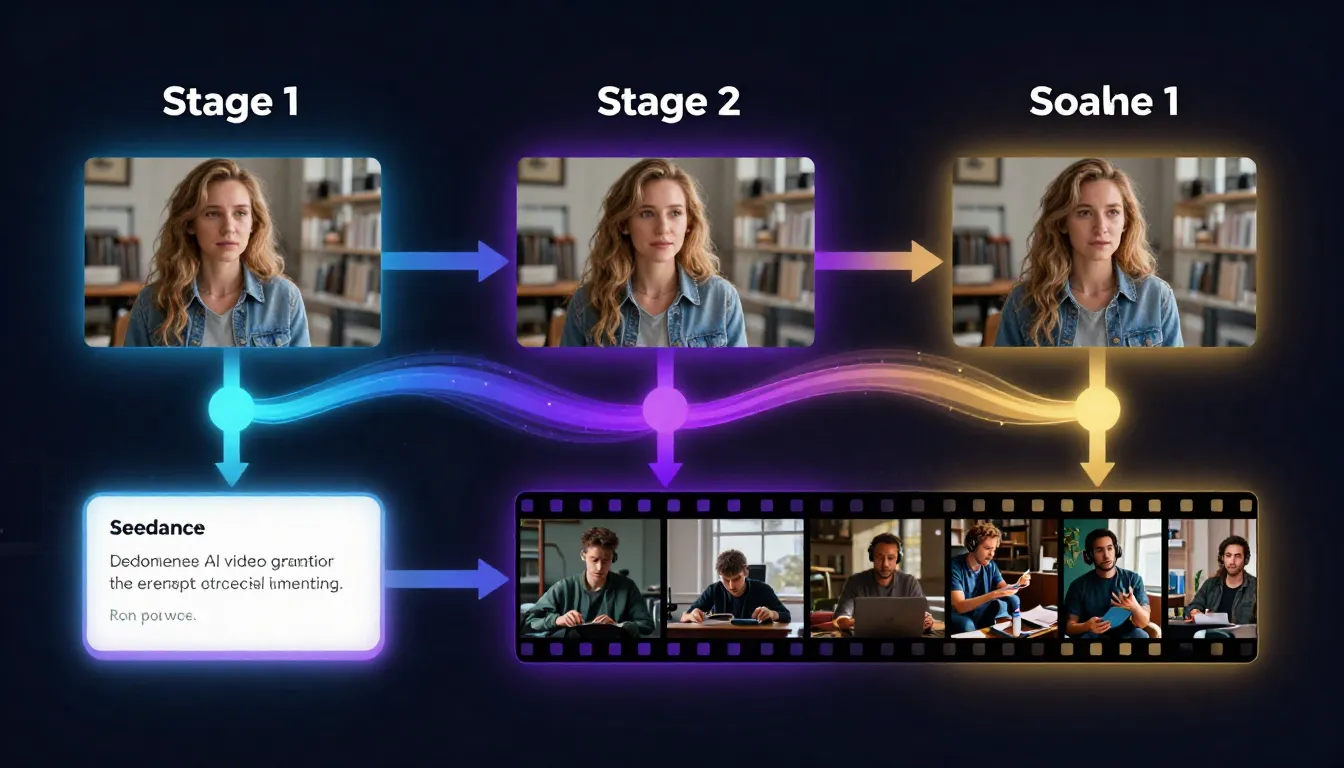
The Seedance pipeline: describe your idea, generate a prompt, create a reference image, and produce a video -- all within a single platform. Each step feeds naturally into the next.
Using Seedance Image Prompt Generator
The pipeline starts with your idea. Maybe it is vague: "a woman in a futuristic city at night." Maybe it is specific: "a macro shot of a dewdrop on a leaf at sunrise." Either way, the Image Prompt Generator transforms it into a detailed, multi-dimensional prompt that AI image models respond to far better than casual descriptions.
Here is what the Image Prompt Generator does:
- Expands your description across all 7 dimensions of a professional prompt: subject, environment, lighting, color, composition, style/medium, and quality modifiers
- Lets you select a visual style that matches your intended video aesthetic -- photorealistic, cinematic, illustration, anime, and more
- Optimizes for downstream use: the generated prompt produces images that are inherently video-ready, with proper composition and depth
For a complete guide to image prompt engineering, see our AI Image Prompt Generator Guide.
The key advantage: prompts designed for video-ready images are fundamentally different from prompts designed for standalone images. The Image Prompt Generator understands this distinction and can produce prompts that prioritize the characteristics that make great first frames -- motion space, depth layers, clear subjects, and cinematic composition.
Using Seedance Text-to-Image
Once you have your optimized prompt, Text-to-Image generates the actual reference image. This is where your first frame comes to life.
The workflow is iterative:
- Generate an initial batch of images from your prompt
- Evaluate each image against the first-frame design principles discussed earlier: Does it have motion space? Are the depth layers clear? Is the subject well-defined? Is the lighting consistent and intentional?
- Refine and regenerate until you have a reference image that meets your standards
- Select the best candidate as your first frame
The advantage of generating your first frame rather than using an existing photograph is complete creative control. You are not limited by what you have already photographed. You can create any scene, any character, any environment, with exactly the composition, lighting, and mood that your video needs.
For the full guide to text-to-image generation, see our Text-to-Image Complete Guide.
Using Seedance Image-to-Image
What if you already have an image -- a photograph, a rough sketch, a screenshot from another project -- but it is not quite right for use as a first frame? Image-to-Image transforms existing images into polished, video-ready reference frames.
Common image-to-image workflows for first frame creation:
- Style transfer: Take a casual smartphone photo and transform it into a cinematic, professionally lit scene that works as a first frame
- Enhancement and refinement: Upscale a small image, sharpen soft details, correct lighting issues, and add the visual polish needed for high-quality video generation
- Composition adjustment: Modify an existing image to add more motion space, improve depth layers, or rebalance the subject placement for video use
- Aesthetic transformation: Apply a specific visual style (noir, golden hour, sci-fi, pastoral) to an existing image to establish the mood for the video
For the complete guide, see our Image-to-Image AI Guide.
The Full Seedance Pipeline
Here is the complete end-to-end workflow, from initial idea to finished AI video:
Step 1: Ideation Describe your video concept in plain language. "A robot walking through a neon-lit Tokyo street at night."
Step 2: Prompt Generation Use the Image Prompt Generator to expand your description into a detailed, multi-dimensional image prompt optimized for creating a video-ready reference frame.
Step 3: First Frame Generation Feed the prompt into Text-to-Image to generate your first frame. Iterate until the composition, lighting, subject, and mood are exactly what you want.
Step 4: Optional Refinement If the generated image is close but not perfect, use Image-to-Image to refine it -- adjust the style, enhance details, or modify the composition.
Step 5: Video Generation Upload the finalized first frame to Image-to-Video. Write a motion-focused prompt describing how the scene should come alive. Generate your video.
This pipeline is unique to Seedance. Other platforms support image-to-video, but they require you to bring your own reference images from external tools. Seedance gives you the entire creation chain in one place -- reducing friction, maintaining visual consistency across tools, and enabling faster iteration from concept to finished video.
For a deeper dive into combining these tools, see our upcoming Image-to-Video Workflow Guide.
Platform Comparison: First Frame Support
Understanding how different platforms handle first and last frame input helps you choose the right tool for your needs. Here is an honest comparison based on real-world testing.
| Platform | First Frame | Last Frame | AI Image Generation | Best For |
|---|---|---|---|---|
| Seedance 2.0 | Yes | Text-guided | Built-in (full pipeline) | End-to-end workflow, all-in-one pipeline |
| Kling 3.0 | Yes | Yes | No (external images only) | Long-duration videos, high consistency |
| Runway Gen-4 | Yes | Yes (via style ref) | No | Precise motion control, professional editing |
| Pika 2.0 | Yes | No | No | Quick, simple image-to-video |
| Sora | Yes | Limited | No | Creative, artistic video generation |
| Veo 3 | Yes | Image conditioning | No | High visual quality, Google ecosystem |
| Luma Dream Machine | Yes | Yes | No | Smooth motion, natural physics |
Honest Assessment
Seedance's unique advantage is the integrated pipeline. No other platform lets you generate your reference images and then immediately use them for video generation within the same tool. This eliminates the friction of switching between apps and maintains visual consistency across the workflow. The AI Image Generator and Text-to-Image tools are specifically tuned to produce video-ready output.
Where competitors excel: Kling 3.0 produces longer videos (up to 2 minutes) from a single first frame, which is unmatched in the industry. Runway Gen-4's Motion Brush and Director Mode offer more granular control over which parts of the frame move and how. Pika 2.0 offers the simplest interface for beginners who just want to upload and go. Luma Dream Machine handles physics-based motion (water, fabric, hair) with exceptional realism.
The bottom line: If your workflow involves creating original reference images and generating video from them, Seedance provides the most streamlined experience. If you already have high-quality reference images and need specific features like long duration or pixel-level motion control, other platforms may serve specific needs better.
For a comprehensive comparison of all platforms, see our Best AI Video Generators 2026 Comparison.
Common Mistakes with First and Last Frames
After working with thousands of first-frame and last-frame video generations, these are the errors we see most frequently. Avoiding them will save you significant time and credits.
1. Using Low-Resolution Images
The mistake: Uploading a 400x300 thumbnail scraped from a website or a heavily compressed JPEG from a messaging app.
Why it fails: The image encoder extracts far less detail from a low-resolution image. The resulting latent representation is sparse and noisy, giving the video model insufficient information to maintain sharpness, consistency, and detail across frames. Pixelation in the first frame gets amplified across every generated frame.
The fix: Always use the highest resolution version of your image. Minimum 1024x1024 pixels for reliable results. If your only source is a small image, use an AI upscaler first -- but understand that upscaling adds resolution, not information. For the best results, generate a fresh high-resolution first frame using Text-to-Image.
2. Overly Complex Scenes
The mistake: Using a first frame with dozens of subjects, intricate patterns, cluttered backgrounds, and multiple focal points.
Why it fails: The video model must determine what should move, what should stay still, and how everything should interact. A scene with 20 people, multiple overlapping objects, and a busy background presents an exponentially harder problem than a scene with 1-2 subjects and a clean background. The model cannot handle the complexity and produces artifacts, inconsistencies, or generic "everything moves a little" output.
The fix: Simplify. One or two main subjects. A background that supports the scene without competing for attention. If you need complex scenes, consider generating them in layers -- animate individual elements and composite them in post-production.
3. Inconsistent Lighting Between First and Last Frame
The mistake: First frame lit with warm studio lights from the left, last frame lit with cool natural light from above.
Why it fails: The model attempts to interpolate between two fundamentally different lighting setups. This creates an unnatural mid-video lighting shift that looks like a broken transition rather than natural time passage. Shadows move in contradictory directions, skin tones shift unnaturally, and the overall visual coherence breaks down.
The fix: Light both frames identically, or with very minor, intentional variations (e.g., slightly warmer as the scene progresses). If you are going for a time-of-day change, make the lighting shift gradual and in a consistent direction.
4. Drastically Different Compositions Between Frames
The mistake: First frame is a wide establishing shot; last frame is an extreme close-up. Or: first frame has the subject on the left, last frame has a completely different subject on the right.
Why it fails: The model treats the transition between frames as a continuous motion path. A dramatic change in framing or composition requires the model to hallucinate a complex camera movement or subject transformation that is beyond its reliable capability. The result is usually a smeared, morphing mess.
The fix: Keep compositions similar. If you want a zoom-in, start at medium and end at medium-close -- not at wide and end at extreme close-up. If you want subject movement, keep the same framing and move the subject within it. Small compositional changes, not large ones.
5. Ignoring Aspect Ratio Mismatch
The mistake: Uploading a 16:9 landscape first frame but setting the video output to 9:16 portrait.
Why it fails: The model must either crop your carefully designed first frame (losing composition and context) or hallucinate large amounts of missing visual content (introducing inconsistencies). Either outcome degrades the output significantly.
The fix: Match aspect ratios. If your first frame is landscape, generate landscape video. If you need portrait video, crop your first frame to portrait BEFORE uploading. Or better yet, generate a portrait-oriented first frame from the start.
6. Using AI-Generated Images with Visible Artifacts as First Frames
The mistake: Generating a first frame with an AI image tool, noticing that it has slightly malformed hands, an extra finger, or a warped face -- and using it anyway.
Why it fails: AI video models faithfully reproduce and often amplify any artifacts present in the first frame. That slightly wrong hand in the still image becomes a grotesquely warped hand in motion. That subtly asymmetric face becomes a morphing nightmare across 30 frames.
The fix: Be ruthless about first frame quality. If an AI-generated image has any visible artifacts -- hands, fingers, facial symmetry, text rendering, geometric distortions -- regenerate it. The few minutes spent getting a clean first frame prevent hours of failed video generations. Use Image-to-Image to fix specific issues while preserving the overall composition.
Frequently Asked Questions
What is a first frame in AI video generation?
A first frame is a reference image that you provide to an AI video generator to define the starting point of the video. Instead of relying entirely on a text prompt to determine what the scene looks like, the first frame gives the AI a concrete visual reference. The model then generates motion and subsequent frames that are consistent with this starting image. The first frame controls the subject's appearance, the scene composition, the lighting, the color palette, and the camera's initial position. It is the single most influential input in image-to-video generation.
Do I need both first and last frames?
No. A first frame alone is sufficient for most use cases and is the more commonly supported input across AI video platforms. The first frame defines the scene, and the AI generates motion based on that starting point combined with your text prompt. A last frame is an additional constraint that defines where the video should end up -- useful for storytelling and precise motion control but not required. Many excellent AI videos are generated with only a first frame. Use a last frame when you have a specific narrative arc in mind (point A to point B) and want the AI to generate the exact motion path between two known visual states.
What resolution should my first frame be?
Minimum recommended resolution is 1024x1024 pixels for reliable results across most platforms. For the best output quality, 1920x1080 (16:9), 1080x1920 (9:16), or 2048x2048 (1:1) are ideal. Higher resolution provides the image encoder with more visual information, resulting in sharper, more detailed video output. Avoid going below 512x512, as the quality drop becomes significant. If your only available image is low-resolution, consider upscaling with an AI upscaler or generating a fresh first frame with Text-to-Image.
Can I use a photograph as a first frame?
Absolutely. Photographs make excellent first frames, and in many cases they are preferable to AI-generated images because they contain authentic detail, natural lighting, and realistic textures. The best photographs for first frames are high-resolution, well-composed, properly exposed, and contain a clearly defined subject. Avoid heavily filtered, extremely compressed, or low-light photographs. Professional photographs, product photos, portraits, and landscape shots all work well. The image should be clean and free of significant noise or compression artifacts.
How do I maintain character consistency across the video?
Character consistency starts with the first frame. Provide a clear, well-lit image where the character's face, clothing, and distinctive features are fully visible. The more information the AI has about the character's appearance, the better it can maintain that appearance across frames. Specific tips: use front-lit or three-quarter-lit portraits (avoid harsh shadows across the face), choose distinctive clothing and accessories that the model can track, keep the video duration short (5-10 seconds maintains tighter consistency than 30 seconds), and avoid prompting for extreme motions that require the model to reconstruct the face from unusual angles. If consistency is critical, generate shorter clips and assemble them in a video editor.
Which AI video generators support first frame upload?
All major AI video generators in 2026 support first frame upload: Seedance 2.0, Kling 3.0, Runway Gen-4, Pika 2.0, Sora, Veo 3, and Luma Dream Machine. The feature is now considered table stakes. Where platforms differ is in their last frame support, the quality of their image conditioning, and the additional tools they provide around the first frame workflow. Seedance is unique in offering a built-in image generation pipeline (prompt generator, text-to-image, image-to-image) that feeds directly into the video generator. See our platform comparison section above for details.
Can I generate first frames with AI instead of using photographs?
Yes, and this is one of the most effective approaches. AI-generated first frames offer complete creative control -- you can create any scene, character, environment, or composition you can describe, without being limited by what you can photograph. Seedance provides a complete pipeline for this: use the Image Prompt Generator to create an optimized prompt, then Text-to-Image to generate the image, optionally Image-to-Image to refine it, and finally Image-to-Video to animate. The key caveat: inspect AI-generated first frames carefully for artifacts (malformed hands, facial asymmetry, pattern distortions) before using them for video generation, as any imperfections will be amplified in the video.
What is the difference between a first frame and a style reference?
A first frame is used as the literal starting image of the video. The AI generates motion forward from this exact image, maintaining its content, composition, and visual details. A style reference (offered by some platforms like Runway) is used to guide the aesthetic of the video without requiring the output to start from that exact image. The style reference influences color grading, lighting quality, texture, and overall mood, but the video's content is still determined primarily by the text prompt. Think of it this way: a first frame says "start here and move forward." A style reference says "make it look like this." Some workflows benefit from both -- using a first frame for content control and a style reference for aesthetic control.
Start Creating Controlled AI Videos
The gap between randomly generated AI video and intentionally directed AI video comes down to one thing: reference frames. A thoughtfully designed first frame transforms AI video generation from a slot machine into a creative tool. A paired first and last frame turns it into a storytelling medium.
Here is how to put everything in this guide into practice:
Step 1: Design your reference images. Use the Image Prompt Generator to create detailed prompts optimized for video-ready composition, lighting, and subject design.
Step 2: Generate your first frame. Use Text-to-Image to create a high-quality reference image that embodies everything you want your video to look like. Iterate until the composition, subject, and mood are right.
Step 3: Create your video. Upload the first frame to Image-to-Video, write a motion-focused prompt, and generate. Your reference image ensures the output matches your creative vision -- not the AI's best guess.
Step 4: Refine and iterate. Generate variations, adjust your prompts, and experiment with different first frame compositions. Each iteration teaches you more about what the model responds to.
The tools are ready. The techniques are laid out. The only variable is your creative vision.
Generate your first frame --> -- create the perfect reference image for your next AI video.
Create videos from images --> -- transform your reference frames into dynamic video content.
Design prompts for perfect frames --> -- let AI help you write the ideal first-frame prompt.
Learn the full pipeline --> -- master the complete workflow from concept to finished video.