
There are three practical ways to animate a photo: let an AI image to video model generate the motion, split the picture into layers for a 2.5D parallax move, or freeze most of the frame and loop one moving detail as a cinemagraph. This guide shows how to animate a photo with each method, using real results we generated for this article, the exact prompts and settings we used, and the problems we ran into along the way.
How to animate a photo in 5 steps
If you just want the short version, this is how to animate a photo with an AI image to video tool:
- Pick a sharp photo with room for motion. Sky, water, hair, fabric, smoke and traffic all animate well.
- Upload it to an image to video generator such as GenWorldAI Image to Video.
- Describe the motion in one or two sentences: what moves, how fast, and what the camera does.
- Choose the length, resolution and aspect ratio, then generate.
- Review the clip, adjust the prompt if something looks wrong, and download the version you like.
The rest of this guide explains each step, shows two other ways to make a picture move, and covers the fixes for the most common problems.
Three ways to make a picture move
Each method gives a different kind of motion, so choose by the result you want rather than by the tool.
| Method | What moves | Best for | Effort |
|---|---|---|---|
| AI image to video | The whole scene: subjects, weather, water and the camera | Landscapes, street scenes, old photos, product shots | Fastest: upload, prompt, generate |
| 2.5D parallax | Flat layers slide at different speeds; nothing inside a layer changes shape | Travel photos, posters, documentary style intros | Moderate: layer separation and keyframing |
| Cinemagraph | One small region moves in a loop; everything else stays frozen | Social posts, website headers, ads | Moderate: a short clip, a mask and a loop |
Method 1: Animate a photo with AI image to video
An image to video model looks at your still photo and predicts plausible motion for it: clouds drift, water ripples, people walk, the camera glides. You do not draw any keyframes. You describe the movement in plain language and the model fills in every frame.
Step 1: Choose a photo that can move
The photo matters more than the prompt. Before you animate a still photo, check three things:
- Resolution and sharpness. Blurry or tiny images give the model less detail to work with, and the result often looks smeary. Use the largest version you have.
- Something that naturally moves. A sky, a lake, hair, a flag or a street gives the model an obvious job. A plain wall does not.
- A clear subject with some space around it. Subjects squeezed against the edge of the frame are the ones most likely to warp or vanish.
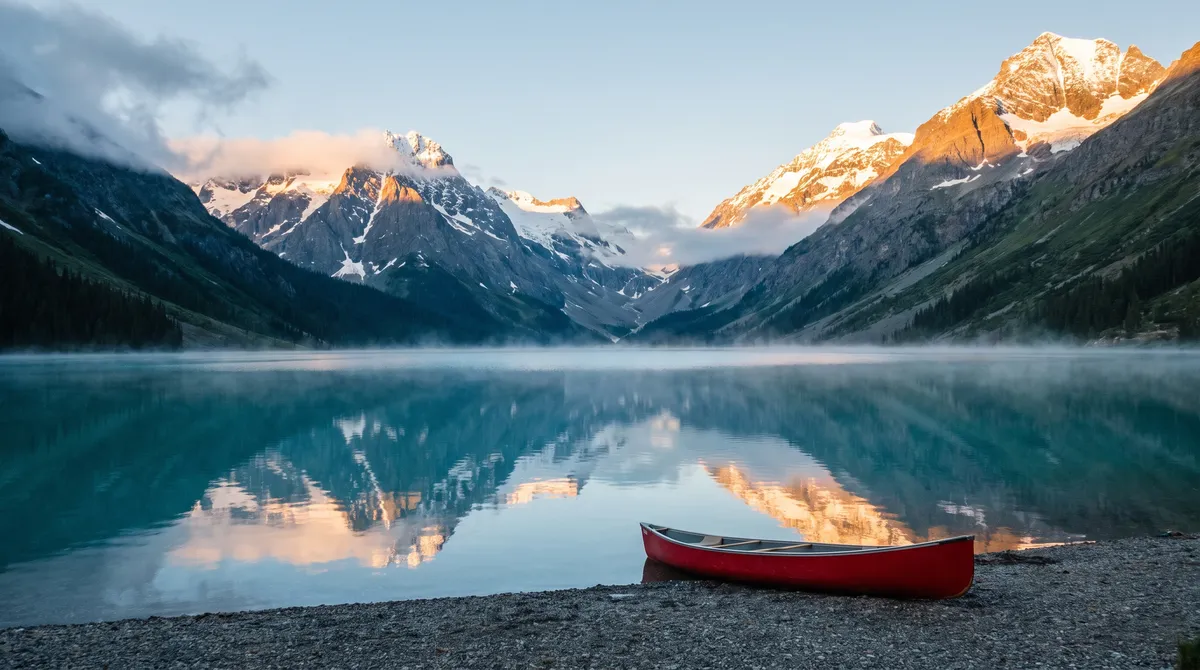
Here is the source photo we used for the example above. It was itself generated for this guide, so it shows no real place or person.
Step 2: Upload the photo to an image to video tool
Open GenWorldAI Image to Video and upload your photo. You can upload one image, or two images if you want to control where the motion ends (more on that below). Generating requires a free account and credits; the generate button shows the exact credit cost before you start.
Step 3: Describe the motion, not the picture
The photo already tells the model what the scene looks like, so the prompt should only say what changes. This is the prompt we used for the lake:
The low clouds roll slowly over the mountain ridges, thin mist drifts across the lake surface, soft ripples spread along the shore, and the morning light slowly brightens on the snow peaks. Slow cinematic push-in toward the red canoe. Realistic natural motion.
Notice the structure: subject motion first, then secondary motion, then the camera, then the style to keep. A reusable template looks like this:
[Main subject] [does what] [how fast]. [Secondary motion in the scene]. [Camera move, or "static camera"]. [Look to keep, such as "realistic" or "black and white film grain"].
If you find prompts hard to write, the AI video prompt generator (2 credits per prompt) can turn a rough idea into a structured motion prompt that you paste into the image to video tool.
Step 4: Choose length, resolution and aspect ratio
On GenWorldAI you can choose 4, 8 or 12 seconds, 480p, 720p or 1080p, and an aspect ratio. Match the aspect ratio to your photo so nothing gets cropped; we used 16:9 for the lake, 3:4 for the portrait-format street photo and 21:9 for the wide volcano shot. Turn audio off if you only need silent motion, since clips with audio cost more credits. For reference, our 4 second 720p silent clips cost 32 credits each and the 8 second one cost 65.
Step 5: Review and iterate
Watch the clip a few times before you download it. Look at faces, hands, edges of the frame and any text in the picture, because that is where problems show up first. If something is off, change one thing in the prompt and generate again. Each of our clips was ready in under two minutes, so a few rounds of iteration is practical.
Control the motion with a start and an end frame
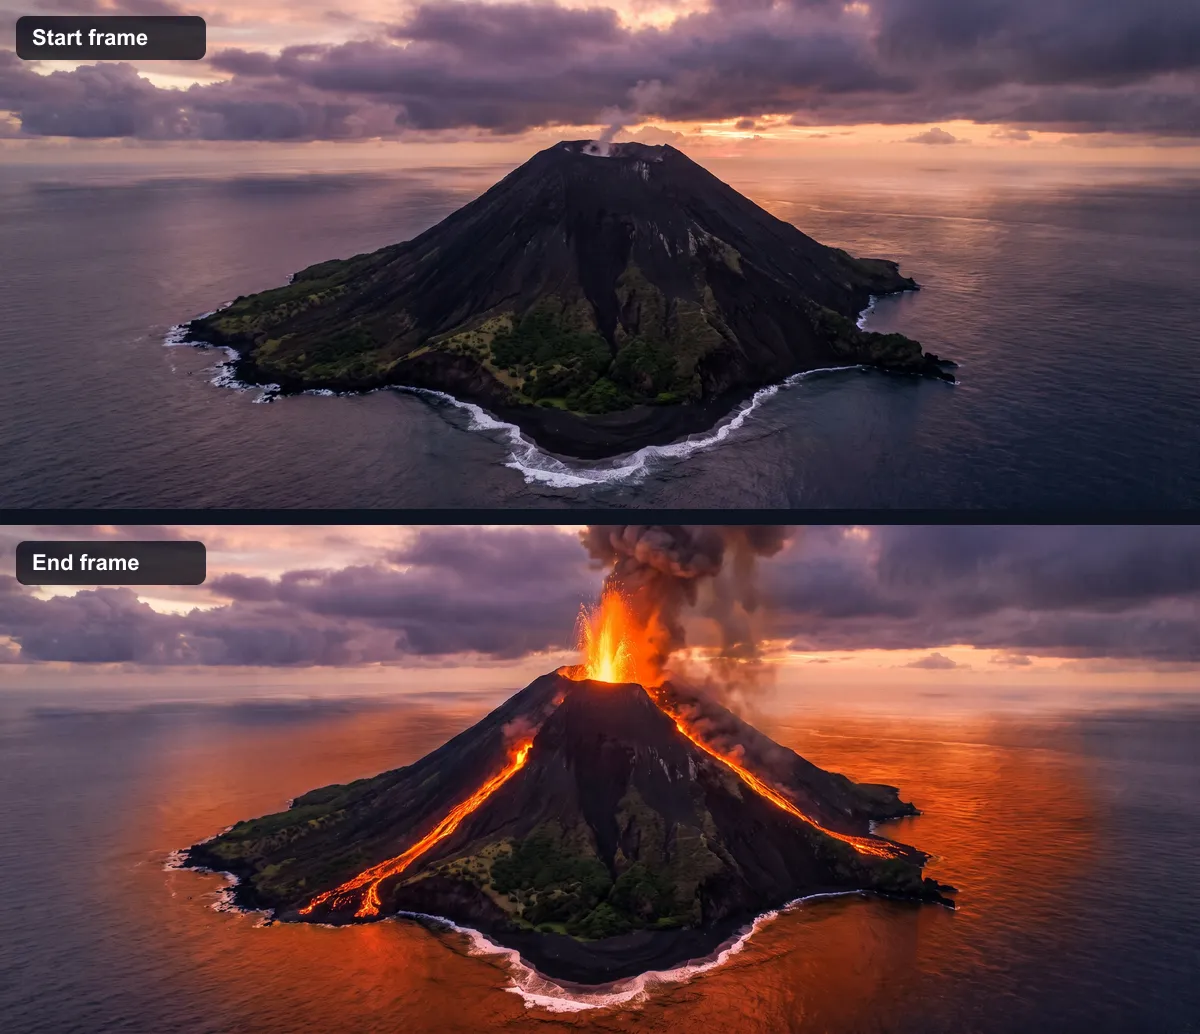
When you upload two images, the first becomes the start frame and the second the end frame, and the model animates the change between them. This gives you far more control than a prompt alone, because you decide exactly where the motion lands.
For this example we generated a photo of a dormant volcanic island, then edited a copy of the same image so the volcano was erupting. Keeping the camera position, framing and sky identical in both frames is what makes the transition believable.
Bring old photos to life
Old photos are one of the most popular reasons people want to animate a photo. The process is the same, with two extra habits: describe the look you want to keep (black and white, film grain), and keep the motion modest so the image still feels like a photograph.
We tested this on a 1950s style black and white street scene, generated for this guide rather than taken from a real archive.
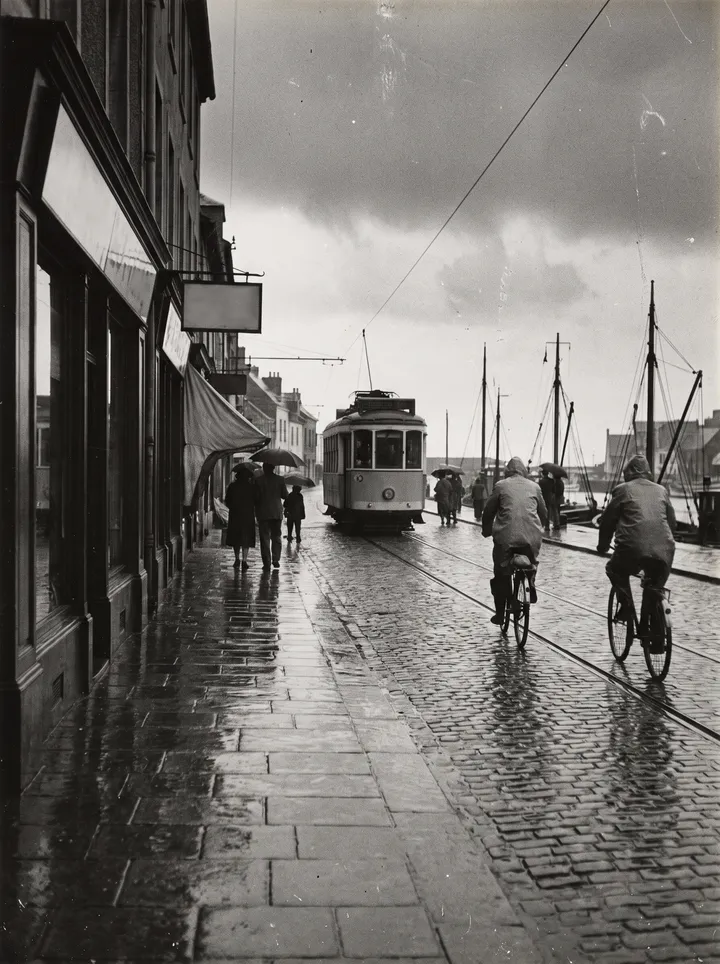
The tram, the pedestrians and the rain look right, but watch the two cyclists in the foreground: by the last second they have disappeared. Small subjects that move toward the edge of the frame are easy for the model to lose. A shorter clip, a prompt that mentions them again ("the two cyclists stay in frame"), or a crop that gives them more room usually fixes it.
When you animate real family photos, scan or photograph the print at the highest resolution you can, and remove dust and scratches first. Treat the result as an illustration, not a recording: the motion is invented by the model, so do not present it as real footage of the people in the picture.
Method 2: Create a 2.5D parallax effect from layers
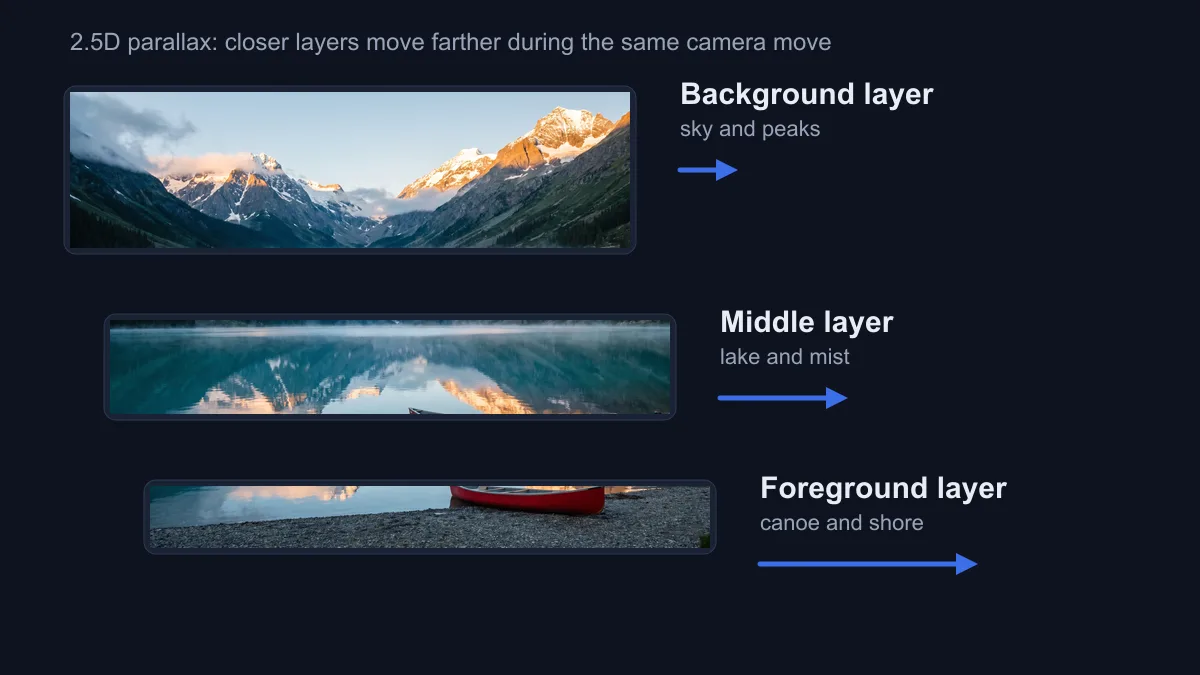
A 2.5D parallax, sometimes called a 3D photo effect, does not invent new motion inside the picture. Instead, the photo is cut into layers (for example background, middle and foreground) and a virtual camera moves past them. Closer layers travel farther than distant ones, which tricks the eye into seeing depth.
To make a picture move this way:
- Split the photo into layers. Doing this by hand means masking each object in an image editor. A faster route is to split a photo into layers with ImageToPsd.AI, which separates the image with AI and exports the layers as PNG files or an editable PSD.
- Fill the gaps. When the foreground slides, the background behind it is exposed. Extend or repaint those areas so no holes appear.
- Stack the layers in a video editor such as After Effects, DaVinci Resolve or any editor with keyframes, with the background at the back.
- Animate a slow camera move. Move or scale the foreground the most, the middle less and the background least. Five to eight seconds is plenty.
- Export at the size of the platform where you will post it.
Choose parallax over AI when the photo contains text, logos or faces that must not change shape, or when you need the exact same motion every time. Choose AI when you want things inside the picture to move, such as water flowing or people walking, which layers alone cannot do.
Method 3: Animate only part of the photo (cinemagraph)
A cinemagraph keeps almost the whole image frozen and loops one moving detail: steam rising from a cup, a flag in the wind, a single waterfall. It feels calmer than a full animation and works well as a website header or social post.
The quickest way to make one is to generate a short AI clip with a static camera and only one moving element, then mask everything else back to the still frame and loop the result. Our full guide, What Is a Cinemagraph? How to Make One with AI, walks through it with examples.
Common problems when you animate a photo
| Problem | Why it happens | What to try |
|---|---|---|
| Faces or hands warp | Small details and large motion do not mix | Use a sharp, well lit photo; ask for "subtle" or "gentle" motion; use 4 seconds instead of 8 |
| People or objects vanish | Small subjects near the frame edge get lost, as with our cyclists | Mention them again in the prompt, crop to give them room, or shorten the clip |
| The camera moves when you wanted it still | The model adds camera motion by default | Write "static camera, no camera movement" in the prompt |
| Text and logos melt | Video models redraw every frame and rarely keep letters exact | Use the parallax method, or add text afterwards in an editor |
| Motion is too fast | One short clip, too many actions | Use words like "slowly", describe one main action, or choose a longer clip |
| Flicker or crawling textures | Low resolution source or very fine patterns | Start from a sharper photo and generate at 720p or 1080p |
FAQ
How do you animate a still photo?
Upload the photo to an image to video tool, describe what should move and what the camera should do, choose a length and resolution, and generate. If you want motion without any distortion, split the photo into layers and animate a 2.5D parallax move in a video editor instead.
How do I turn a photo into an animation?
For realistic motion, use AI image to video, which creates every in-between frame for you. For a stylized look, generate a cartoon or anime version of the photo first, then animate that image. For a looping effect with one moving part, make a cinemagraph.
How do I animate a photo on my iPhone?
Open a web based image to video tool such as GenWorldAI in Safari, upload the photo from your library, generate the clip and save it back to Photos. Live Photos are something different: they are short clips the camera records at the moment you take the picture, not animation added later.
Is there a free way to animate a photo?
The layer based parallax method can be done for free with a free video editor such as DaVinci Resolve. AI image to video costs compute, so most tools charge for it. On GenWorldAI, new accounts get 2 starter credits, while the cheapest clip (4 seconds, 480p, audio off) costs 20 credits, so animating a photo with AI requires a credit plan. The exact cost is shown on the generate button before you start.
How long should an animated photo be?
Four seconds is enough for social posts and website headers, and short clips are more stable. Use 8 or 12 seconds when the motion needs time to develop, such as a transition from a start frame to an end frame.
What photos are hardest to animate?
Group shots with many small faces, photos with readable text, and very busy patterns. Landscapes, single portraits and scenes with water, smoke or weather are the easiest ways to start.
Start animating your photo
Pick one photo, write one sentence about what should move, and generate a 4 second test clip in GenWorldAI Image to Video. Once the motion looks right, try a longer clip or a start and end frame. If you do not have a suitable photo yet, create one with Text to Image and animate it straight away.
How we made the examples: every photo and clip in this guide is AI-generated and was created on October 8, 2026 for this article. Source photos were made with the Nano Banana Pro model and animated with the GenWorldAI 1.5 Pro model at 720p with audio off. Clips are shown without edits, apart from compression for the web.