
TL;DR
Using Seedance takes three steps: (1) upload your assets or open the text prompt editor, (2) describe what you want, (3) click Generate and download your video. This guide walks through every generation method — Text-to-Video, Image-to-Video, and Video-to-Video — with real examples, prompt tips, and strategies for getting the best results. Try it now for free →
Prerequisites: What You Need Before Starting
Before generating your first video, here's what you need:
Account: Sign up at seedance-2ai.org — free, takes 30 seconds, no credit card required. Every new account receives free credits.
Browser: Any modern browser works — Chrome, Firefox, Safari, or Edge. No software download needed.
Input Materials (optional, depends on generation type):
- For Image-to-Video: A clear photo (JPG, PNG, or WebP). Minimum 512×512 pixels, ideally 1024×1024 or larger. Faces should be clearly visible if character animation is the goal.
- For Video-to-Video: A video clip (MP4) up to 15 seconds. This serves as a reference for motion, camera angles, or style.
- For Text-to-Video: Nothing needed except your imagination and a well-written prompt.
Method 1: Text-to-Video — Generate Videos from Text Prompts
Text-to-Video is the most accessible way to start. You describe a scene in natural language, and Seedance generates a complete video. This costs 6 credits per generation.
Step 1: Open the Generator
Navigate to the generator interface on the homepage. Select Text-to-Video as your generation mode.
Step 2: Choose Your Model
Select which Seedance model to use:
- Seedance 1.0 Lite — Fastest results, good for testing ideas
- Seedance 1.0 Pro — Higher quality, balanced speed
- Seedance 2.0 — Best quality, full multi-modal support
For your first generation, I recommend Seedance 1.0 Pro — it's a good balance of quality and speed, and you'll learn the prompt format without spending too many credits.
Step 3: Write Your Prompt
This is where the magic happens. A good prompt contains several key elements:
[Subject] + [Action] + [Setting] + [Style] + [Camera] + [Lighting] + [Quality]Example — Basic prompt (mediocre results):
A woman walking on a beachExample — Optimized prompt (cinematic results):
A beautiful young woman with flowing auburn hair walks barefoot along
a golden sand beach at sunset. She wears a light white linen dress
billowing in the warm ocean breeze. Gentle waves lap at her ankles.
Golden hour backlighting creates a warm halo around her silhouette.
Cinematic wide shot, slow tracking movement right to left. Shallow
depth of field, anamorphic lens flare. 4K film quality.
The difference in output quality between these two prompts is dramatic. For detailed prompt engineering techniques, see our Seedance Prompt Guide with 50+ examples.
Step 4: Configure Parameters
Set your generation parameters:
- Duration: 4s, 8s, 10s, or 15s (longer = more credits, start short for testing)
- Aspect Ratio: 16:9 (landscape), 9:16 (vertical/TikTok), 1:1 (square), 4:3, 3:4, or 21:9 (ultra-wide)
- Resolution: Up to 1080p
Pro tip: Start with 4-5 second generations to test your prompt. Once you're happy with the result, generate the full-length version.
Step 5: Generate and Download
Click Generate. Depending on the model and queue, generation typically completes within 1-3 minutes. Once done, preview the result and download your watermark-free video.
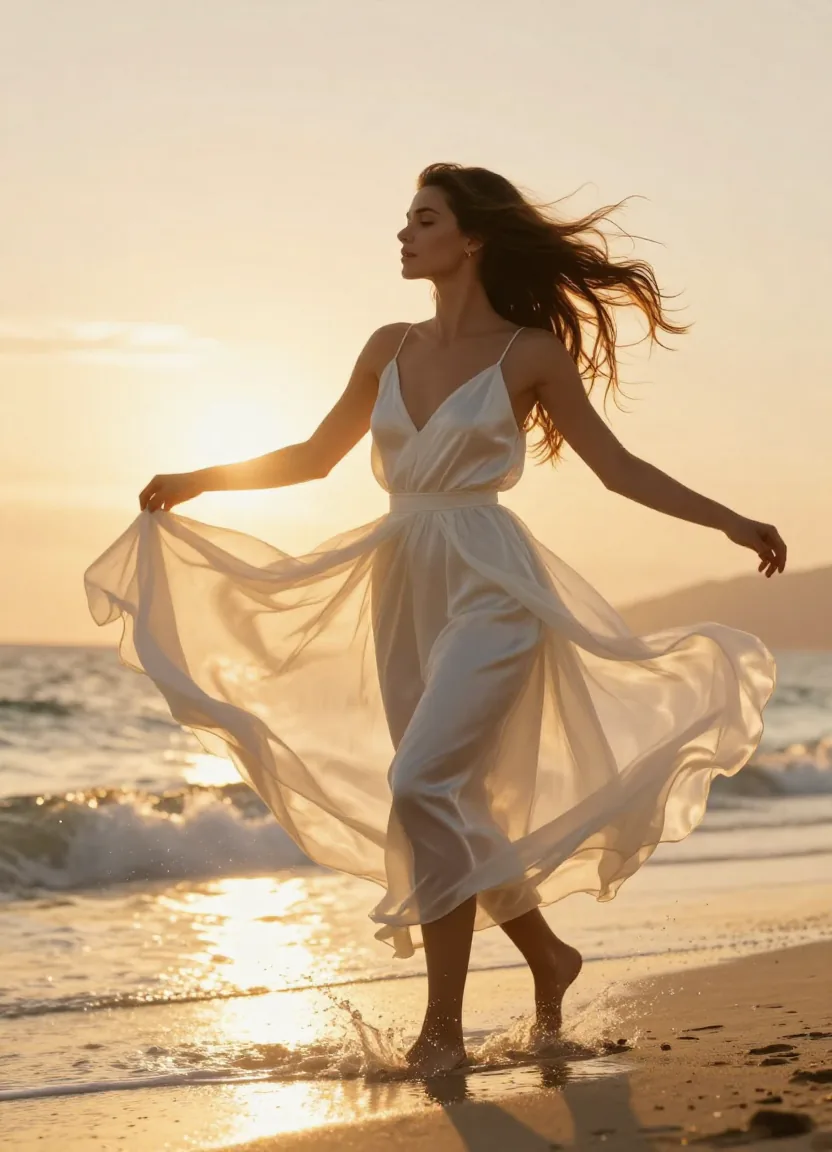
Text-to-Video result from Seedance — a single text prompt generated this cinematic beach scene with natural motion and golden-hour lighting.
Text-to-Video Pro Tips
- Be specific about lighting. "Golden hour backlighting" gives dramatically different results than "well lit."
- Specify camera movement. "Slow dolly in" or "tracking shot left to right" gives the AI clear direction.
- Include style references. "Vogue editorial style" or "Christopher Nolan cinematography" helps the AI understand your aesthetic.
- Use quality modifiers. Always end with "ultra-realistic 4K cinematic quality" or similar.
- Avoid contradictions. Don't say "close-up wide shot" — the AI gets confused by conflicting instructions.
Method 2: Image-to-Video — Animate Your Photos
Image-to-Video takes a static photo and brings it to life as a video. This costs 8 credits per generation and is often the most reliable method because you're giving the AI a strong visual reference.
Step 1: Prepare Your Image
The quality of your input image directly affects the output quality. Follow these guidelines:
- Resolution: Minimum 512×512, ideally 1024×1024+
- Clarity: Sharp, well-lit photos produce the best animations
- Faces: If animating a person, ensure the face is clearly visible and not obscured
- Composition: Simple, clean compositions work better than cluttered scenes
Step 2: Upload and Describe Motion
Upload your image to the generator, then describe what motion you want:
The woman in the photo slowly turns her head to the right and
smiles. A gentle breeze blows her hair. Camera slowly pushes
in from medium shot to close-up. Warm afternoon lighting.
Step 3: Review the Before and After
One of the most satisfying aspects of Image-to-Video is seeing your static photo come to life.
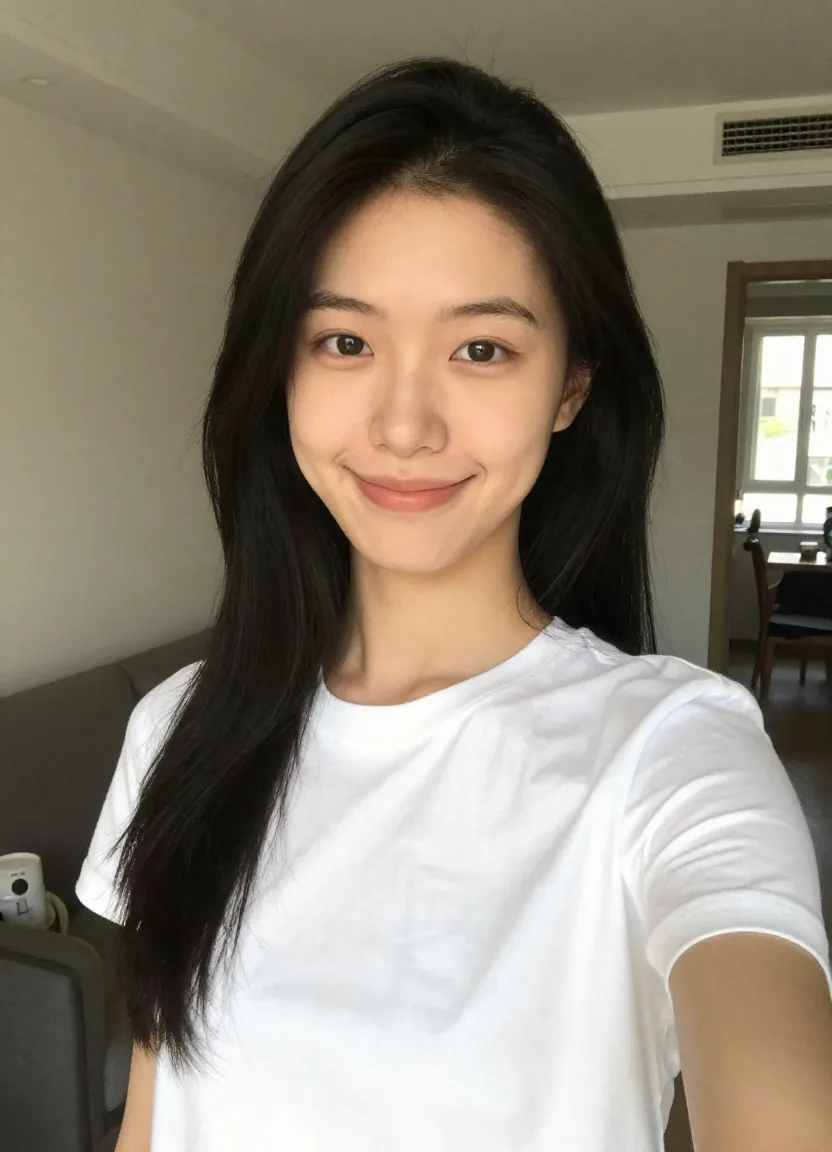
Before — a casual everyday photo uploaded as input to Seedance Image-to-Video.
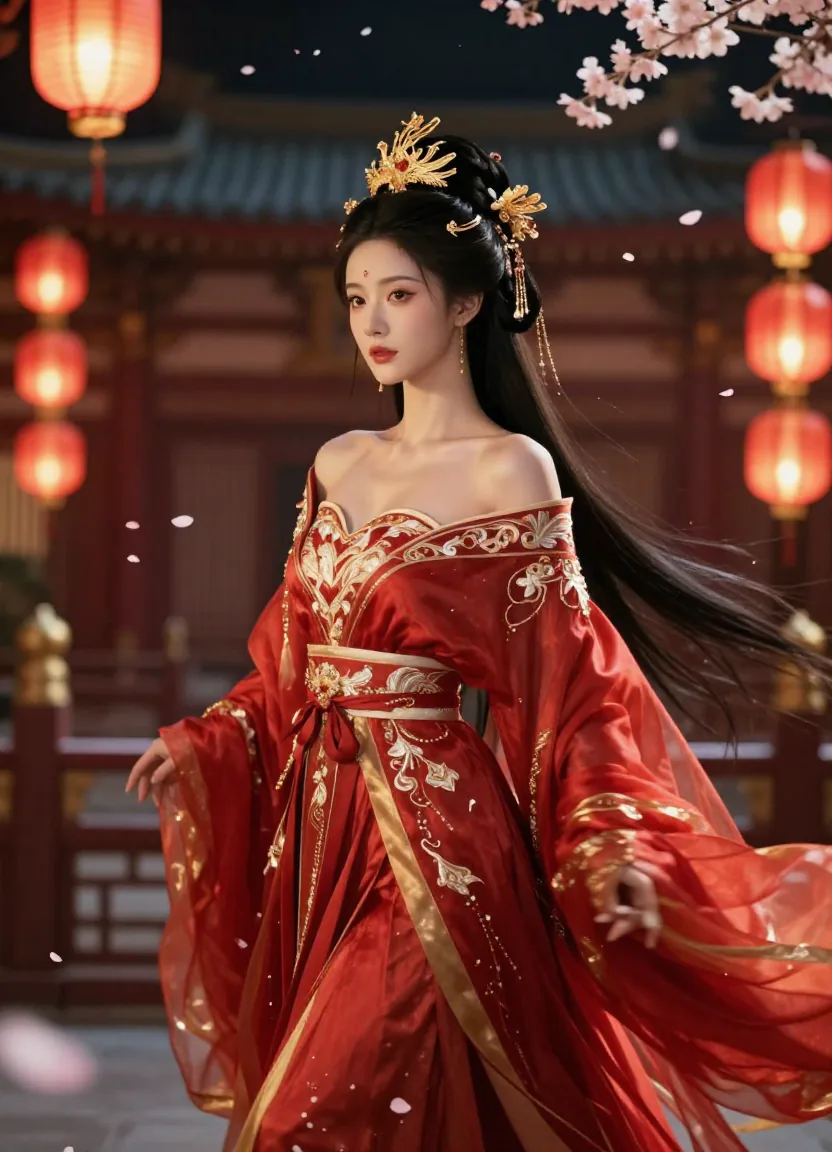
After — the same person transformed into a cinematic palace drama scene, maintaining facial identity while completely changing the setting and wardrobe.
Image-to-Video Best Practices
- Portraits work best. Clear face shots produce the most impressive animations.
- Avoid heavy filters. Heavily edited or filtered photos can confuse the AI. Use original, natural photos.
- Match your prompt to the image. Don't upload a beach photo and ask for a snowy scene — the AI will struggle with the contradiction.
- Use reference images with good lighting. Well-lit photos give the AI more information to work with.
For a deeper dive into image-to-video generation, including which images work best and advanced prompt techniques, read our complete image-to-video AI guide.
Method 3: Video-to-Video — Transform Existing Videos
Video-to-Video takes an existing video clip and transforms it — applying new styles, transferring motions to different characters, or enhancing quality. This costs 10 credits per generation.
Use Cases
- Style transfer: Convert a realistic video to anime, oil painting, or cyberpunk aesthetic
- Motion reference: Extract camera movements or choreography from one video and apply them to new content
- Quality enhancement: Upscale and enhance existing footage
How It Works
- Upload your source video (MP4, up to 15 seconds)
- Describe the transformation you want
- Select your output model and parameters
- Generate
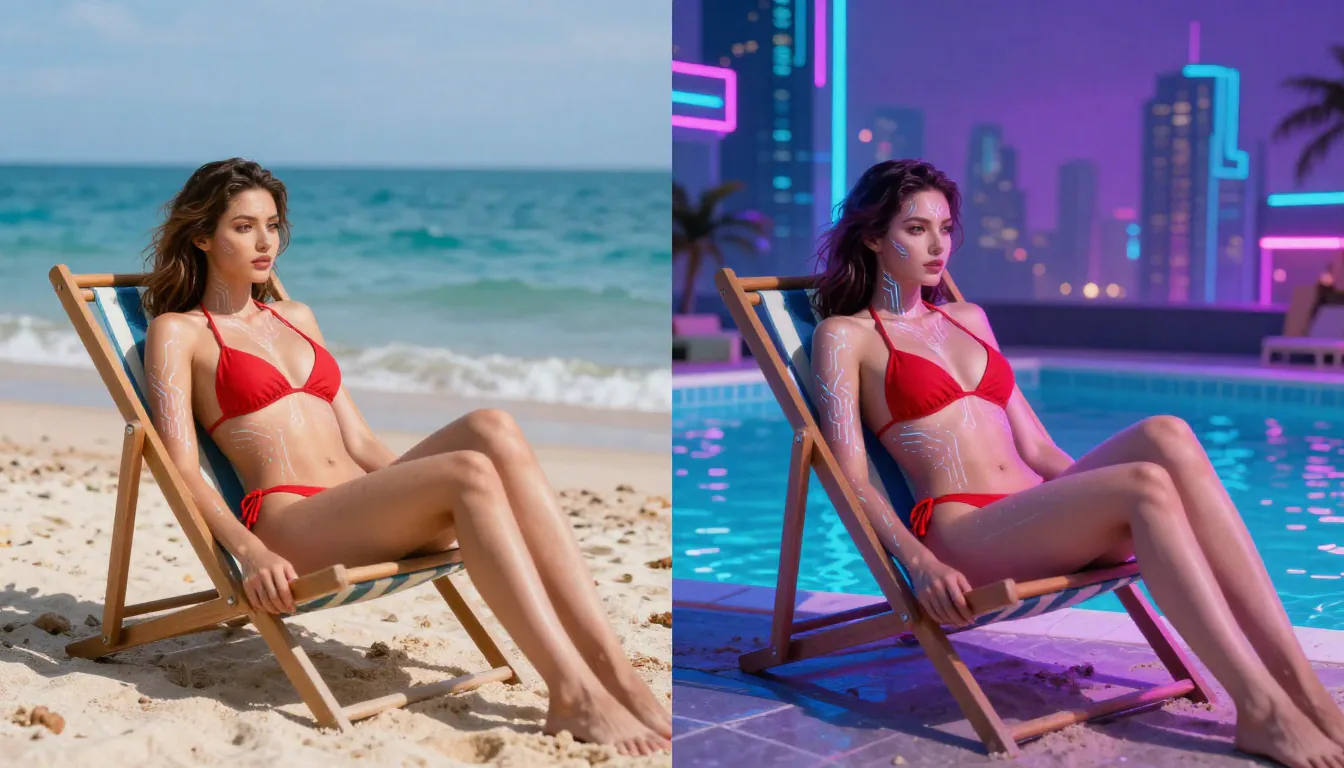
Video-to-Video style transfer — the same scene transformed from photorealistic beach to cyberpunk neon aesthetic while maintaining identical composition and motion.
Video-to-Video Tips
- Keep source clips short. 5-10 seconds works best for style transfer.
- Clean, stable footage helps. Shaky handheld footage produces less predictable results.
- Be specific about the target style. "Transform to Studio Ghibli anime style with soft watercolor textures" works better than "make it anime."
How to Use Seedance for Free
You don't need to pay anything to start using Seedance. Here's how to make the most of your free credits:
- Start with Text-to-Video (6 credits/video) — it's the cheapest generation type
- Use Seedance 1.0 Lite for initial prompt testing — lower quality but uses fewer credits
- Write detailed prompts to minimize retries — every retry burns credits
- Generate at 4-5 seconds first — verify the result before committing to longer videos
- Earn bonus credits through daily logins and referrals
For a detailed strategy on maximizing free credits, see our Seedance Free Guide.
Advanced Tips: Getting the Best Results
Prompt Engineering
The single most impactful skill for AI video generation is writing good prompts. Key principles:
- Specificity beats length. "A woman in a red dress walking confidently down a rain-soaked Tokyo alley at night, neon reflections on wet pavement, cinematic tracking shot" is more effective than a 500-word description.
- Structure matters. Follow the formula: Subject → Action → Setting → Style → Camera → Lighting → Quality.
- Learn from examples. Our Prompt Guide contains 50+ tested prompts across cinematic, portrait, action, nature, and fantasy categories.
Using Reference Videos Effectively
When using Video-to-Video or the multi-modal input of Seedance 2.0:
- Camera movement reference: Upload a video with the exact camera movement you want (dolly, pan, tilt, tracking). The AI will replicate this movement in your generated content.
- Motion/choreography reference: Upload a dance video, and Seedance will transfer that choreography to your specified character.
- Pacing reference: The timing and rhythm of your reference video influences the pacing of the output.
Batch Generation Workflow
For content creators who need multiple videos:
- Write all your prompts in advance
- Use Seedance 1.0 Lite to generate quick previews of each
- Refine the prompts that didn't work
- Generate final versions with Seedance 2.0 or Pro
- Download and organize by project
This approach typically saves 30-40% on credits compared to ad-hoc generation.
Combining Multiple Input Modes
One of the most powerful techniques in Seedance 2.0 is combining input modes. For example, you can upload a portrait photo for character identity, attach a reference video for camera movement, and add a text prompt for scene description — all in a single generation. This multi-modal approach gives you fine-grained control over every aspect of the output.
Here's a practical workflow: Start with a high-quality headshot of your subject. Then find a reference clip with the exact camera movement you want (a slow dolly-in, a dramatic crane shot, etc.). Finally, write a prompt that describes the scene, wardrobe, and lighting. The result combines the person's likeness, your chosen camera dynamics, and the creative direction from your text — all in one cohesive video.
This technique is especially useful for brand content, where you need a specific person performing a specific action in a specific setting. It eliminates the trial-and-error of pure text-to-video generation.
Iterative Refinement Strategy
Don't expect perfection on the first try. The best results come from an iterative process. Generate your first version with Seedance 1.0 Lite. Watch the output carefully and identify what works and what doesn't. Then refine your prompt — adjust the lighting description, tweak the camera angle, add more detail to the subject's appearance.
Once your prompt consistently produces good results on Lite, upgrade to Seedance 1.0 Pro or 2.0 for the final render. This iterative approach ensures you spend premium credits only on well-tested prompts, maximizing both quality and cost efficiency.
Keep a simple text file or spreadsheet of your tested prompts and their results. Over time, you'll build a personal library of reliable prompts that you can remix and reuse for future projects.
Optimizing for Specific Content Types
Different content types require different prompt strategies:
- Product showcases: Focus on clean backgrounds, smooth 360-degree rotation, and studio lighting. Include terms like "product photography," "white cyclorama background," and "soft diffused lighting."
- Social media hooks: Front-load the visual impact. Describe the most eye-catching moment first. Use fast cuts, bold colors, and dramatic camera movements to capture attention in the first two seconds.
- Storytelling sequences: Generate multiple short clips (4-5 seconds each) that form a narrative when edited together. Keep character descriptions identical across prompts to maintain visual continuity.
Aspect Ratio Selection Guide
Choose your aspect ratio based on where the video will be used:
| Platform | Recommended Ratio | Notes |
|---|---|---|
| TikTok / Reels / Shorts | 9:16 | Vertical, full screen on mobile |
| YouTube | 16:9 | Standard landscape |
| Instagram Feed | 1:1 or 4:3 | Square or slightly tall |
| Instagram Stories | 9:16 | Full vertical |
| Twitter/X | 16:9 or 1:1 | Landscape or square |
| Film/Presentation | 21:9 | Ultra-wide cinematic |
Common Issues and Troubleshooting
Generation Failed
- Check your credit balance. Failed generations don't consume credits in most cases.
- Simplify your prompt. Very complex prompts with contradictory instructions can cause failures.
- Try a different model. If Seedance 2.0 fails on a specific prompt, try Pro or Lite.
Result Doesn't Match the Prompt
- Be more specific. Vague prompts produce unpredictable results.
- Add negative descriptions. If you're getting unwanted elements, explicitly describe what you don't want.
- Use reference images. Switch to Image-to-Video for more predictable output.
Character Looks Different Across Frames
- Use Seedance 2.0. The character consistency engine is significantly better in 2.0 compared to earlier versions.
- Upload a clear face reference. Image-to-Video with a sharp portrait gives the AI the best reference for maintaining consistency.
- Keep prompts simple. Don't ask for dramatic character changes mid-video.
Low Quality or Blurry Output
- Check your input image resolution. Low-res inputs produce low-res outputs.
- Use quality modifiers in your prompt. Always include "ultra-realistic," "4K quality," "sharp detail."
- Choose 1080p resolution in your generation settings.
Unnatural or Jerky Motion
- Avoid overly complex actions. Asking a character to perform multiple rapid movements in a short clip often produces unnatural transitions. Focus on one smooth action per generation.
- Describe motion speed explicitly. Words like "slowly," "gently," or "gradually" help the AI produce fluid movement. Without speed cues, the model may default to abrupt motions.
- Use longer durations for complex movement. A 4-second clip leaves little room for nuanced motion. If your scene involves walking, turning, or dancing, generate at 8-10 seconds to give the AI enough frames to render smooth transitions.
Video Has Unwanted Artifacts or Distortions
- Simplify the scene composition. Scenes with too many subjects, reflective surfaces, or fine details (like jewelry or text on clothing) are more prone to visual artifacts. Reduce complexity where possible.
- Avoid generating text or readable words. AI video models still struggle with rendering legible text. If your scene includes signs, logos, or written content, expect distortions. Plan to overlay text in post-production instead.
- Try a different seed or regenerate. Sometimes artifacts are random. Generating the same prompt again often produces a cleaner result. If the issue persists, the prompt itself likely needs adjustment.
Slow Generation or Stuck in Queue
- Check peak hours. Generation times increase during high-traffic periods. If speed is critical, try generating during off-peak hours (early morning or late evening in US time zones).
- Switch to a faster model. Seedance 1.0 Lite processes significantly faster than 2.0. If you need quick turnaround for testing, use Lite first and reserve 2.0 for final renders.
- Reduce video duration. Shorter clips (4-5 seconds) process faster than 10-15 second generations. If your project allows it, generate shorter segments and combine them in a video editor.
FAQ
How do I use Seedance 2.0?
Visit seedance-2ai.org, create a free account, and choose your generation method: Text-to-Video, Image-to-Video, or Video-to-Video. Write or upload your input, select a model and parameters, then click Generate. Your video will be ready in 1-3 minutes. For detailed instructions, see the step-by-step sections above.
Can I use Seedance for free?
Yes. Every new user gets free credits upon signup. No credit card is needed. You can generate multiple AI videos with your free credits across all models and features. For strategies on maximizing free credits, see our free guide.
What's the best model for beginners?
Start with Seedance 1.0 Pro. It offers a good balance of quality and credit efficiency. Use Lite for quick prompt testing, and upgrade to Seedance 2.0 when you need the best quality or multi-modal features.
How long does generation take?
Typical generation time is 1-3 minutes depending on the model, video duration, and current queue load. Seedance 1.0 Lite is the fastest, followed by Pro, then 2.0.
What image formats does Seedance support for Image-to-Video?
Seedance accepts JPG, PNG, and WebP images. Minimum resolution is 512×512 pixels. For best results, use images at 1024×1024 or higher with clear subjects and good lighting.
What's Next?
You now know how to use every generation method in Seedance. To take your results to the next level:
- Master prompt engineering → Read our Seedance Prompt Guide with 50+ examples
- Understand the platform → Learn what Seedance is and how it compares to competitors
- Maximize free usage → Follow our free credits optimization guide
- See real examples → Browse our 10 creative use cases with real output
- Use AI video for marketing → Learn how to create ads, social content & brand videos